Showing posts with label Printing. Show all posts

Friday, 1 April 2011

How to compress images in Word and Powerpoint

Inserted images in Word and Powerpoint may appear small, but they are actually stored as their original size unless compressed. This can cause printing to take a long time and needlessly increase file sizes. Thankfully there is a way to compress images in both these applications.

Office 2000, XP and 2003

Open the view menu and select 'Pictures' from the 'Toolbars' sub-menu. The picture toolbar, as shown below, should appear.

Click on the 'Compress pictures' icon (highlighted in orange on the above picture).

This opens the following window.
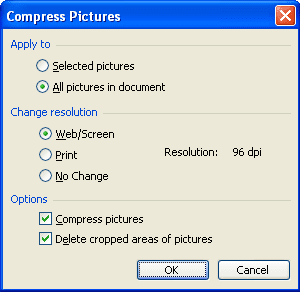

Select 'Web/Screen' for the highest level of compression, or 'Print' for a lower level. Make sure that 'Apply to' is set to 'All pictures in document', and click 'OK'.

You may then receive the following warning. If you do, click the 'Apply' button.


Office 2007 and 2010


Click on any image to enable 'Picture Tools', and click the 'Format' tab shown below.


Click the 'Compress Pictures' button (highlighted in orange on the above picture), to open the following window.
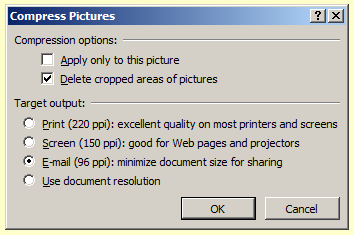
Select whichever level of compression best suits your purposes. Make sure that 'Apply only to this picture' is not selected, and click the 'OK' button.
Wednesday, 16 March 2011

How to print two pages per sheet

Cutting down on the amount of paper used in printing not only saves money, but is also more environmentally friendly. Some applications offer the option of printing multiple pages per sheet of paper. In this post I will show you how to print two pages per sheet in MS Word and Adobe Acrobat Reader.

MS Word
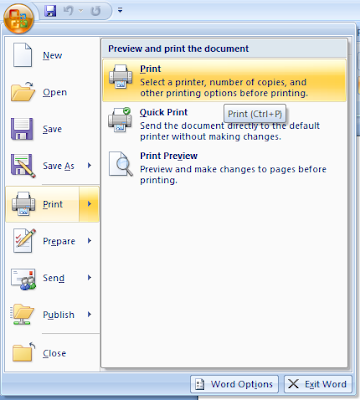
Open the print dialogue from the 'File' menu in older versions of Word, or by clicking the Office Button in newer versions (as shown below).


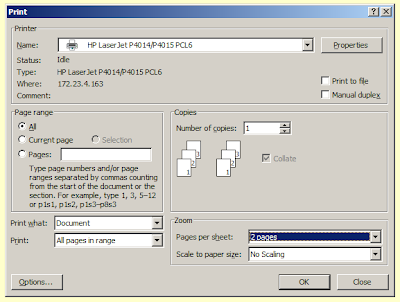
Simply set 'Pages per sheet' to '2 pages' and click 'OK'.


Adobe Acrobat
Open the print dialogue from the 'File' menu.
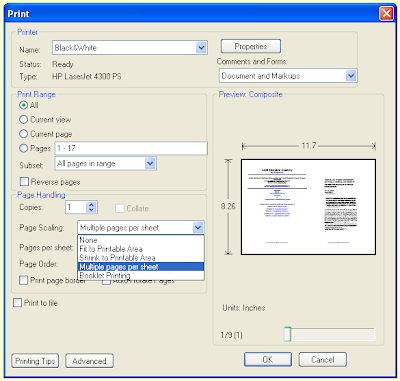
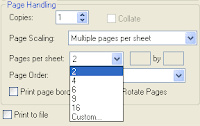
Change 'Page Scaling' to 'Multiple pages per sheet' and 'Pages per sheet' to '2'.


OpenOffice
I found no easy way to print two pages per sheet in OpenOffice, but you can save the file as a pdf using the 'Export as PDF' tool in the 'File' menu and then open it in Adobe Acrobat and follow the above instructions.

Tuesday, 16 June 2009

Printing from Excel - Part 2

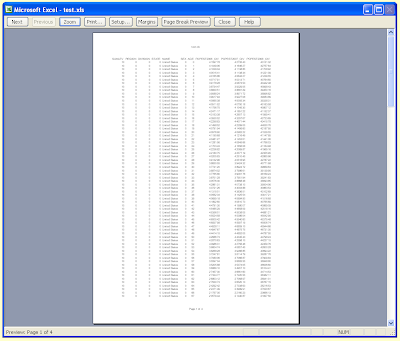
In the last post I showed how to format an Excel sheet so that it fitted to the page and added page numbers. The end result as displayed in Print Preview is as shown here.


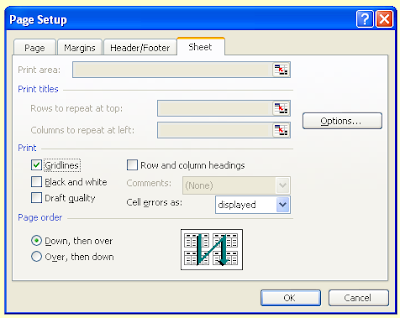
As we can see there are no gridlines on the print. We can either remedy this by selecting border types on the table or, more easily, we can set a print option to show simple gridlines. To do this go to Print Preview, click the 'Setup...' button and select the 'Sheet' tab. Here, I select the Print Gridlines option, as shown.


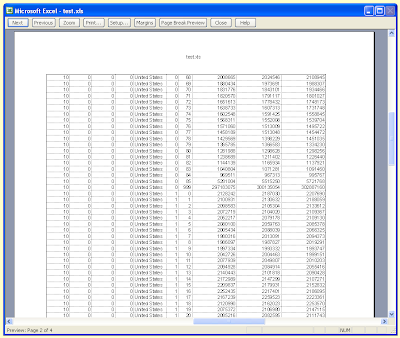
After I click 'OK', the Print Preview looks like this. I have zoomed in on the preview so that you can see the gridlines more clearly.


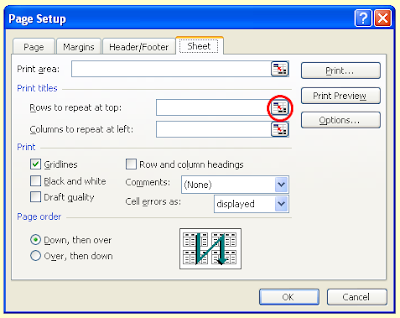
The above is a preview of page 2, where we can see that there are no column headers as there are on page 1. We can tell Excel to print the column headers on each page to make the print of the table more user-friendly. To do this I need to close the Print Preview, and select 'Page Setup' from the 'File' menu, which enables some extra options. On the 'Sheet' tab I click the circled button.


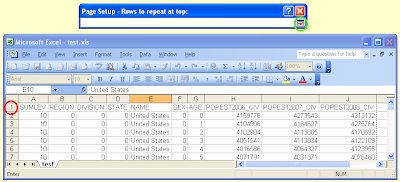
This opens the following option box. I now click the row that I want to repeat. In this case it is row 1, so I click the appropriate button as circled in red, and close the option box by clicking the button circled in green. This will enter the appropriate code into the 'Rows to repeat at top' option. After, I click 'OK' I have a well formatted spreadsheet ready to be printed.


As you can see there are a number of other options that I have not explored here. If you have a document that prints on many pages you may want to click the 'Margins' button and adjust the size of the print area by clicking and dragging the various dotted lines, but be careful to leave enough of a margin around the table so that the print is not ruined - at least a centimetre (or about half an inch) should be enough. If you have a particularly wide document you may not be able to fit it onto one page width, in which case you can also set the print to repeat columns in much the same way as I did for rows. Printing Excel spreadsheets may be a fiddly business, but with a little effort you can achieve some very good results.

Friday, 12 June 2009

Printing from Excel - Part 1

Printing from Microsoft Excel is markedly different to printing from Word. Whereas in Word we can usually just tell it to print without worrying that much about formatting the page, in Excel we will usually have to specifically tell it how we want to print our speadsheets, and this can sometimes be a little fiddly. Because there is quite a lot of fiddling that can be done I have split these instructions over two posts.


Pictured above is an example of a spreadsheet - in this case a dataset of U.S. population information. Exciting, I know. When I press the Print Preview button [pictured right] I see the following:


As we can see, not all the columns are shown on the first page. If I go down to page 6 we can see the missing column.


To remedy this situation I click the 'Setup..' button in the Print Preview. This opens up the following option box.


I could change the orientation to 'Landscape' as this would enable the missing column ; however, for the purposes of this tutorial I will keep it set to 'Portrait'. Instead, I reduce the scaling until the final column appears on the first page. In this case I set it to 80% of normal size.


I could also have achieved the same result by selecting all the data and reducing the font size, the column width and row height; although I find adjusting the scaling to be easier. The Print Preview now looks like this:


As yet there are no page numbers shown. In order to have page numbers displayed I click 'Setup..' again and open the 'Header/Footer' tab. Here I can select whether I want the page numbers to be shown at the top or the bottom of the page by choosing an option from the appropriate drop-down list, two of which are shown below.


As you can see from the drop-down lists, there are other options available for what will be displayed in the header or footer, including file name and date. I now have a serviceable format for my document that I can print out. At the same time I have reduced the number of pages from ten to four. There are a number of other print formatting options available that I will explore in the next post.

Saturday, 11 April 2009

Print the web and save the world (again)

Web browsers such as Internet Explorer and Firefox are notoriously bad at printing. You can end up with many disparate pages with sidebars and parts of images on, you have no idea how many pages are going to come out, and you use more paper than you need; which, can't be good for the environment - let alone your finances.

This is not the fault of the browser programmers, but rather, it is 'the nature of the beast'. One of the advantages of web pages is that they are not subject to the limitations of the printed page. Many web programmers are kind enough to supply a printable version of their pages. If there is no link to a 'printer friendly version,' then the best thing to do is to copy what you want and paste it into a word processor, which will then bypass all the problems mentioned above.

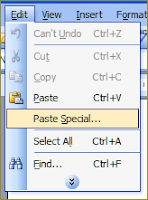
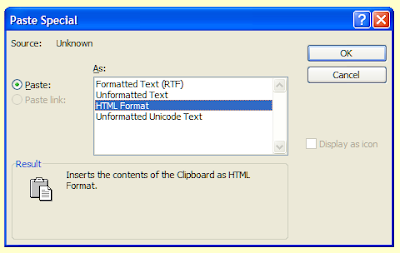
You can select the information you want by clicking and dragging with the mouse, although, this can be an irritating process, as your selection often randomly includes images that you don't want. When pasting into your word processor, you can make your life easier by using 'Paste special', which you should find in the 'Edit' menu. This will give you a selection of text formats.

If you just want the plain text from the web page and not the images, then select 'Unformatted text.'

If you wish to print both images and the formatted text, that is, keeping the same font used on the web page as well as any text formatting such as bold or italic, then select 'Rich text format'. Unfortunately this option is not available for text copied from the Firefox or Opera browsers, the latter of which does not support 'HTML format' either.

Avoid 'HTML format' as this will attempt to reconstruct the web page as a word processed document, often recreating the problems that you were initally trying to avoid. This option often takes a while to complete too.

You are then free to edit the text to your heart's content. You can change font sizes and remove 'white space' to save paper. You also have the option of adding your own notes to the text. So, reduce your printer output and save the world today.

This article is an edited and updated version of one originally published on Bloody Computer! on 1st October 2007.

Saturday, 14 February 2009

How to save paper when printing pdf files

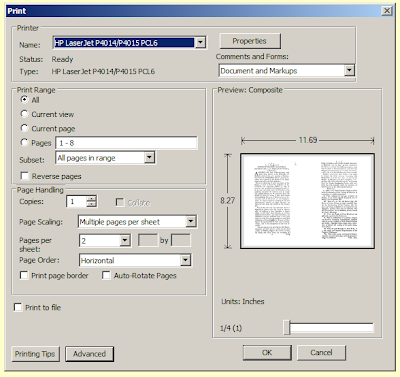
In these days of environmental concern and financial insecurity every little helps, including being able to save paper when printing documents. The Portable Document Format is an incredibly popular file format that can be viewed in Acrobat Reader (developed by the inventors of the file format, Adobe) and in other more lightweight applications, such as the excellent Foxit Reader. Both these programs support printing more than one page of the pdf onto one sheet of paper, as explained below:


Adobe Acrobat
Pull down the 'File' menu and select 'Print'.
On the 'Print' window pull down the drop-down list marked 'Page Scaling' and select 'Multiple pages per sheet'.


Use the other settings to adjust how many pages appear on each sheet. I do not suggest selecting any more than two as this may make the text too small to read. Use the preview on the 'Print' window to make sure that your selections are correct.

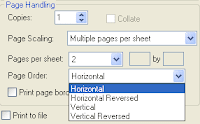
You can also select the order in which the pages are placed on the sheet. Setting this to 'Horizontal' will put the first page on the left and the second on the right of the printed sheet, and so on for the rest.

You can also print a border round the page and rotate the pages should you desire by ticking the appropriate boxes.

If the version of Acrobat Reader doesn't have this facility, you can upgrade to the latest version for free. These instructions should also apply for the latest versions of Acrobat Reader on Mac OSX and Linux.


Foxit Reader
The process is pretty much the same in Foxit Reader; although, the interface is slightly different.

Pull down the 'File' menu and select 'Print'.
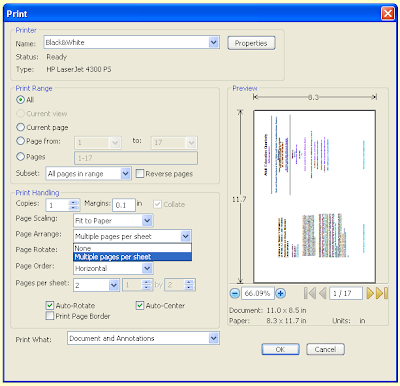
On the 'Print' window pull down the drop-down list marked 'Page Arrange' and select 'Multiple pages per sheet'.


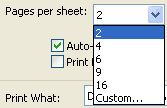
Select how many pages you want to appear on each printed sheet. As with Acrobat, two is probably the best choice.

Set the page order. Usually this will be 'Horizontal'.

Make sure that 'Auto-Rotate' and 'Auto-Center' are ticked.

Tick the 'Print Page Border' box if you want to have each page appear in a box; although you may consider this to be a waste of ink.

Foxit Reader also has a preview of what the first page will look like on the Print window, so you can confirm that your selections are correct.

Wednesday, 21 May 2008

Three tips for buying a new printer

1) Buy what you need, not what the salesperson suggests
It may seem like a good deal to buy an all-in-one printer, scanner, fax and coffee machine, but if you never scan images and don't send faxes you will be buying technology that you will not use. Another problem with these all-in-one devices is that if there is a fault with the scanner you may not be able to print any more. If all you need is a printer, buy a printer.

2) Buy the right type of printer
If you are going to only ever print black and white documents on Letter or A4 sized paper, don't buy a colour printer. Rather, consider buying a B&W laser printer, especially if you are going to do a lot of printing, which makes a laser printer more cost effective. If you need colour prints or are not going to print regularly then an inkjet printer may be preferable, as the initial outlay is less.

If you are only intending to print photographs off from your digital camera look to see if the camera's manufacturer offers a printer designed specifically to work with their range of cameras. This may cost a little more, but the results will generally be better than what you would achieve using a cheaper inkjet on your computer - plus you will probably have the benefit of connecting the printer straight to your camera.

So, think about what type of printing you are actually going to do and buy the best tool for those jobs.

3) Check the price of consumables
Once you have decided what type of printer you want it is time to compare the cost of replacement ink or toner cartridges. Quite often the printer with the lower price will end up costing you more because the ink is more expensive. Remember, you only buy the printer once, you will buy ink or toner again and again.

Monday, 1 October 2007

Print the web and save the world

Web browsers such as Internet Explorer and Firefox are notoriously bad at printing. You can end up with many disparate pages with sidebars and parts of images on, you have no idea how many pages are going to come out, and you use more paper than you need; which, can't be good for the environment - let alone your finances.

This is not the fault of the browser programmers, but rather, it is 'the nature of the beast.' One of the advantages of web pages is that they are not subject to the limitations of the printed page. Many web programmers are kind enough to supply a printable version of their pages. [I must find a way of adding them to this blog... maybe using the RSS feed...] Anyway, if there is no link to a 'printer friendly version,' then the best thing to do is to copy what you want and paste it into a word processor, which will then bypass all the problems mentioned above.

You can select the information you want by clicking and dragging with the mouse, although, this can be an irritating process, as your selection often randomly includes images that you don't want. When pasting into your word processor, you can make your life easier by using 'Paste special;' which, you should find in the 'Edit' menu. This will give you a selection of text formats.

If you just want the plain text from the web page and not the images, then select 'Unformatted text.'

If you wish to print both images and the formatted text, that is, keeping the same font used on the web page as well as any text that is bold or italic, then select 'Rich text format' (unfortunately this option is not available for text copied from Firefox.)

Avoid 'HTML format' as this will attempt to reconstruct the web page as a word processed document, often recreating the problems that you were trying to avoid. This option often takes a while to complete too.

You are then free to edit the text to your heart's content. You can change font sizes and remove 'white space' to save paper. You also have the option of adding your own notes to the text. So, reduce your printer output and save the world today.