Showing posts with label PowerPoint. Show all posts

Saturday, 22 September 2012

Keyboard shortcut of the week: Sub- and Superscript

Occasionally we have to make use of subscripts or superscripts in our documents. The most common use of these is with dates, as in 20th. There the 'th' is a superscript; that is, smaller text that is raised. Subscripts are most often used in technical language such as if we refer to water as H2O. There the subscript is the '2'; smaller text that is lowered.

To switch to subscript mode or to change the selected text to a subscript, hold down the Control key and press the = key. This same combination will also set selected subscript text back to normal and switch out of subscript mode, as with the keyboard shortcuts for bold or italic mode.

To switch to superscript mode or to change the selected text to a superscript, hold down the Control key and the Shift key, and then press the + key. As with subscripts the same combination switches back to normal text to if presses again.

This tip applies to Microsoft Word and PowerPoint, but unfortunately not to Excel.

Friday, 1 April 2011

How to compress images in Word and Powerpoint

Inserted images in Word and Powerpoint may appear small, but they are actually stored as their original size unless compressed. This can cause printing to take a long time and needlessly increase file sizes. Thankfully there is a way to compress images in both these applications.

Office 2000, XP and 2003

Open the view menu and select 'Pictures' from the 'Toolbars' sub-menu. The picture toolbar, as shown below, should appear.

Click on the 'Compress pictures' icon (highlighted in orange on the above picture).

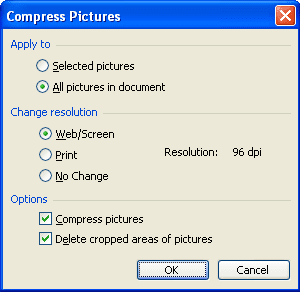
This opens the following window.


Select 'Web/Screen' for the highest level of compression, or 'Print' for a lower level. Make sure that 'Apply to' is set to 'All pictures in document', and click 'OK'.

You may then receive the following warning. If you do, click the 'Apply' button.


Office 2007 and 2010


Click on any image to enable 'Picture Tools', and click the 'Format' tab shown below.


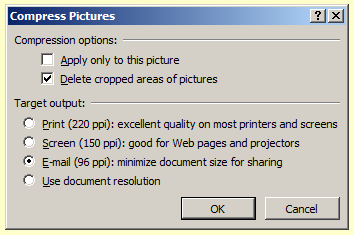
Click the 'Compress Pictures' button (highlighted in orange on the above picture), to open the following window.

Select whichever level of compression best suits your purposes. Make sure that 'Apply only to this picture' is not selected, and click the 'OK' button.

Thursday, 9 July 2009

Customising the Quick Access Toolbar

In a recent post about adding buttons to the toolbars in Microsoft Office applications I pointed out that there is no way to add buttons to the new 'ribbon' that has replaced the old toolbars. Nevertheless, it has come to my attention that there is still one customisable toolbar in the latest versions of Word, Excel and Powerpoint. This is called the 'Quick Access Toolbar'. If you wish to add extra buttons to this toolbar you can do so by following the instructions on the 'Microsoft Office Online' pages. [http://office.microsoft.com/en-us/word/HA012341051033.aspx]

I do not have a copy of MS Office 2007 myself, so I do not know whether you can add a button for the useful 'Past Special' function. If you have a copy of any of the Office 2007 applications, please let me know how you have got on when adding buttons to this toolbar.

Tuesday, 19 May 2009

Putting new buttons on toolbars in MS Office (before the 2007 version)

A while ago I published an article that suggested that rather than printing directly from web browsers, such as Internet Explorer, it is better to copy the information that you want into a word processor and print it from there. In that article I mentioned the use of the 'Paste Special' in Word, which enables you to remove formatting from the information that you paste. In this article I will explain how to put a button for 'Paste Special' onto the toolbar in Microsoft Word 2003 and other earlier versions. This technique can also be used to add any of the other available buttons onto any toolbar.

Open up Word and right-click on one of the toolbars, which are at the top of the screen below the menu and look something like this:


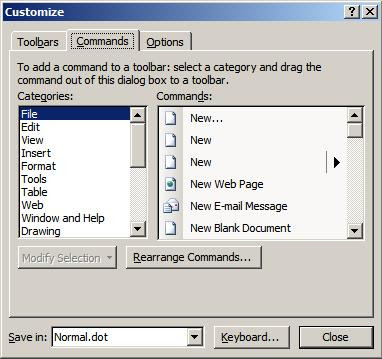
From the menu, select 'Customize...', which will open a dialog box. Click on the 'Commands' tab.


Select 'Edit' from the left-hand menu, because the 'Paste Special' tool is listed in the 'Edit' menu. Scroll down through the list on the right-hand until you see 'Paste Special' then left-click on it and hold the mouse button down. The mouse pointer should change to an arrow pointing at a rectangle with a square to the bottom right, which will have an X in it initially.

Move the pointer up to the toolbars and release the mouse button when it is in a suitable position: next to the normal paste button for example. You will notice that the mouse pointer changed appearance again when you hovered over the toolbar, with the X being replaced with a + to let you know that the new button can be placed there.

Your toolbar should now look something like this:

If you wish to remove a button from the toolbar, follow the instructions above for opening the 'Customize' dialog, but rather than drag from the dialog box to the toolbar, click on the button you wish to remove from the toolbar and drag it into the dialog box.

This process also works in the other Microsoft Office applications such as Excel and PowerPoint. With Office 2007, Microsoft have replaced the old tried-and-tested menu and toolbar arrangement with something called 'ribbons' (as pictured below) and there is no way to customise these in the same way as detailed above.

This is an edited version of a post that first appeared on Bloody Computer! on 19th November 2007.

Monday, 19 November 2007

Putting new buttons on toolbars in MS Office

A while ago I wrote an article that suggested that rather than printing directly from web browsers, such as Internet Explorer, it is better to copy the information that you want into a word processor and print it from there. In that article I mentioned the use of the 'Paste Special' in Word, which enables you to remove formatting from the information that you paste. In this article I will explain how to put a button for 'Paste Special' onto the toolbar in word. This technique can also be used to add any of the other available buttons onto the toolbar.

Open up word and right-click on one of the toolbars, which are at the top of the screen below the menu and look something like this:


From the menu, select 'Customize...', which will open a dialog box. Click on the 'Commands' tab.


Select 'Edit' from the left-hand menu, because the 'Paste Special' tool is listed in the 'Edit' menu. Scroll down through the list on the right-hand until you see 'Paste Special' then left-click on it and hold the mouse button down. The mouse pointer should change to an arrow pointing at a rectangle with a square to the bottom right, which will have an X in it initially.

Move the pointer up to the toolbars and release the mouse button when it is in a suitable position: next to the normal paste button for example. You will notice that the mouse pointer changed appearance again when you hovered over the toolbar, with the X being replaced with a + to let you know that the new button can be placed there.

Your toolbar should now look something like this:

If you wish to remove a button from the toolbar, follow the instructions above for opening the 'Customize' dialog, but rather than drag from the dialog box to the toolbar, click on the button you wish to remove from the toolbar and drag it into the dialog box.

This process also works in the other Microsoft Office applications such as Excel and PowerPoint.

Monday, 12 November 2007

Sounds & videos in PowerPoint on a different PC

If you are setting up a PowerPoint presentation that has audio or video content, make sure that the media files will be available when you give the presentation. For example, you have a slideshow that plays an mp3 when a certain slide is shown. You must make sure that the mp3 file will be accessible wherever you want to show the presentation, that is, if you are using a USB memory stick make sure that the media files are on the stick before you create the link to them in PowerPoint, or if you are using a CD-Rom, make sure all the media files are in the same folder as the PowerPoint file and then burn them all together in the same folder on the CD-Rom.