Open up word and right-click on one of the toolbars, which are at the top of the screen below the menu and look something like this:

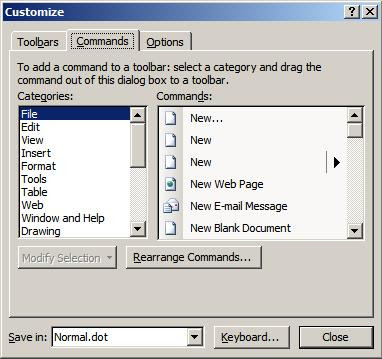
From the menu, select 'Customize...', which will open a dialog box. Click on the 'Commands' tab.

Select 'Edit' from the left-hand menu, because the 'Paste Special' tool is listed in the 'Edit' menu. Scroll down through the list on the right-hand until you see 'Paste Special' then left-click on it and hold the mouse button down. The mouse pointer should change to an arrow pointing at a rectangle with a square to the bottom right, which will have an X in it initially.
Move the pointer up to the toolbars and release the mouse button when it is in a suitable position: next to the normal paste button for example. You will notice that the mouse pointer changed appearance again when you hovered over the toolbar, with the X being replaced with a + to let you know that the new button can be placed there.
Your toolbar should now look something like this:
 If you wish to remove a button from the toolbar, follow the instructions above for opening the 'Customize' dialog, but rather than drag from the dialog box to the toolbar, click on the button you wish to remove from the toolbar and drag it into the dialog box.
This process also works in the other Microsoft Office applications such as Excel and PowerPoint.
0 comments:
Post a Comment