Friday 6 March 2009

How to pin shortcuts to the Start menu

The left hand side of the Start menu in Windows XP and Vista includes a list of recently used applications at the bottom below the divider, and a list of 'pinned' items at the top, as shown below.

You can add and remove shortcuts to this list of 'pinned' items in two ways. Firstly, you can simply drag-and-drop a shortcut from the bottom list to the top, as shown in the following video. Click on the icon in the lower list and hold down the mouse button while you drag the icon up above the divider.


Secondly, right-click on any shortcut and click on 'Pin to Start Menu'.

You can alter the order of the shortcuts by dragging and dropping them into their new position. To remove a pinned shortcut, right-click on it and select 'Remove from this list'. You can also alter the number of shortcuts displayed on the Start menu.

Windows XP
Right-click on the Start menu and click 'Properties' making sure the mouse pointer is not over an icon. You will then see a window like this.


Click the 'Customize...' button to open the following window.

You can adjust the number of programs on the Start menu here. Other settings on this page include the size of the icons on the Start menu, a button to clear the recently used applications and a way to select the email and web browser applications that are displayed on the menu. Adjust these as you desire and click 'OK' to close that window, and 'OK' again to close the first window.

Windows Vista
Right-click on the Start menu and click 'Properties' making sure the mouse pointer is not over an icon. You will then see a window like this.

Go to the 'Start Menu' tab and click the 'Customize...' button.

You can adjust the number of programs on the Start menu on the following window, as well a variety of other features on the Start menu.


Once you have adjusted the settings click 'OK' on both windows to close them and implement the changes.

Friday 27 February 2009

The 14th Carnival of Computer Help and Advice

Welcome to the fourteenth monthly Carnival of Computer Help and Advice - a digest of recent blog articles that spread the wealth of PC knowledge.

First up this month we have the latest post from carnival-regular Andrew Edgington. He presents a guide to Adobe Photoshop Tricks For Absolute Beginners at Learn Photoshop Now.

Readers will no doubt have noticed that the popularity of Twitter is on the rise. The author of Homemaker Barbi, Danelle Ice, has kindly submitted a "quick and easy tutorial will show you how to capitalize your username on Twitter without losing your followers or tweets" in her How To Capitalize Your User Name on Twitter post.

While Twitter's fame is increasing Google's remains strong as they diversify their services. Nevertheless Google's core business is still their search engine, which Amal Bose lifts the lid on in the Google Secrets post at The Techies blog.

I will let the author of the next post introduce it themselves: Zenodice wrote "This is an article I wrote with tips on how to greatly improve firefox's performance as well as some custom code for the truly hardcore users. This will help any Firefox user improve their browser's performance greatly." The post How To: Tweak Firefox For Optimal Browsing Speed (Broadband) is available at The Nexus for anyone who needs to give Firefox a boost.

Talking of speed, Sara Schweiger published a tutorial about Removing Internet Speed Monitor at the Internet Speed Monitor Pro blog. Despite its name Internet Speed Monitor is actually a piece of adware, so her advice on removing it is most welcome.

Jules presents another piece of welcome advice in the article Change Storage Location for Attachments in Outlook Express that was posted at PCauthorities.com. This location is defined when the software is installed and is not easily changed, but Jules offers a step-by-step guide detailing how to do it.

Many people now have computers in a number of rooms in their homes. Ashan Jay explains How to connect two computers (dual screen) over network at the ashPresentom blog. Also, Carl Jagt of Carl Jagt's Tee of the Week fame presents his guide to 10 Great Portable Apps: Use Your USB Thumbdrive for Good for everyone who uses a variety of PCs.

If you are interested in hosting a future carnival please leave a comment on this post or use the contact form over at our Blog Carnival page where you can also submit your blog posts for inclusion. Don't worry, if you don't want to write the Carnival post I can do it for you.

See you all next month for another selection of posts.

Sunday 22 February 2009

Where has all my hard-drive space gone? - Reloaded

Just as you can never have enough cupboard space in your home, you can never have enough hard-drive space. Nevertheless, occasionally we all have to sort through our storage and throw out a few things to make some more room. This is often easier said than done when it comes to your PC as it is not always clear what is taking up all the space.

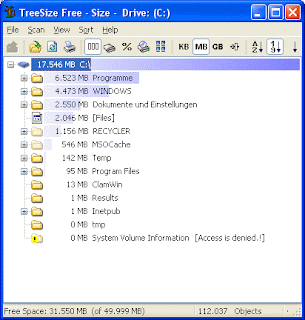
The free version of TreeSize provides a graphical representation of how much hard-drive space your folders are using. Simply right-click on a particularly bloated folder and click on 'Explore' from the menu. This will open up that folder so you can set about deleting any files that are surplus to requirement. Remember to empty the recycle bin when you are finished. I would suggests that you leave the 'Program Files' and 'Windows' folders alone unless you know what you are doing.

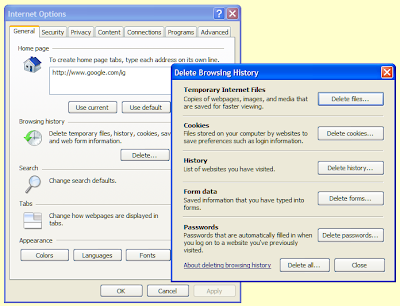
If you use Internet Explorer you may want to delete its cache of temporary files. From the 'Tools' menu select 'Internet Options.' If you use IE version 6 or earlier, click on the 'Delete Files' button. For later versions click the button marked 'Delete...' in the 'Browsing History' section. Click the 'Delete Files' button on the box that opens. You will then be asked whether you are sure, click 'Yes.' Deletion of all the temporary internet files may take a while.
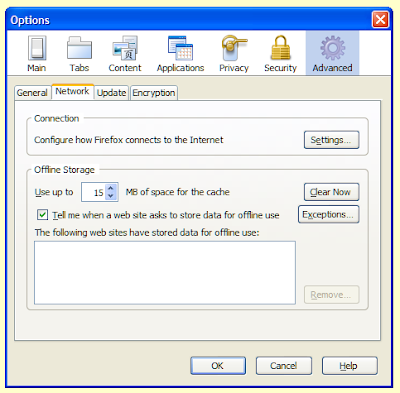
In Firefox, go to the 'Tools' menu and select 'Options..' Click on the 'Advanced' icon. Click on the 'Network' tab. There you will find a button labelled 'Clear now', pressing this will empty the cache.
Also, the save files of many computer games can be quite large. You may want to delete a few of these and the best way to do so is within the game. Usually this facility is located on the 'load game' screen. See these related posts for more ways to recover drive space:-
Spring Cleaning: How to clear out temporary files
Time for a purge: reclaiming hard-drive space

This post comprises amended information from two earlier posts Where has all my hard-drive space gone? and Keyboard shortcut of the week: refreshing changes both posted on 30th August 2007

Saturday 14 February 2009

How to save paper when printing pdf files

In these days of environmental concern and financial insecurity every little helps, including being able to save paper when printing documents. The Portable Document Format is an incredibly popular file format that can be viewed in Acrobat Reader (developed by the inventors of the file format, Adobe) and in other more lightweight applications, such as the excellent Foxit Reader. Both these programs support printing more than one page of the pdf onto one sheet of paper, as explained below:


Adobe Acrobat
Pull down the 'File' menu and select 'Print'.
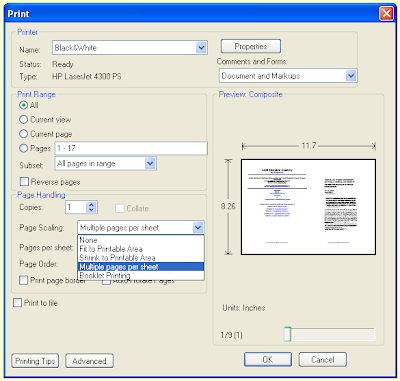
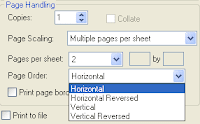
On the 'Print' window pull down the drop-down list marked 'Page Scaling' and select 'Multiple pages per sheet'.


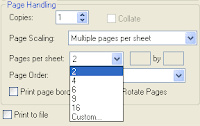
Use the other settings to adjust how many pages appear on each sheet. I do not suggest selecting any more than two as this may make the text too small to read. Use the preview on the 'Print' window to make sure that your selections are correct.

You can also select the order in which the pages are placed on the sheet. Setting this to 'Horizontal' will put the first page on the left and the second on the right of the printed sheet, and so on for the rest.

You can also print a border round the page and rotate the pages should you desire by ticking the appropriate boxes.

If the version of Acrobat Reader doesn't have this facility, you can upgrade to the latest version for free. These instructions should also apply for the latest versions of Acrobat Reader on Mac OSX and Linux.


Foxit Reader
The process is pretty much the same in Foxit Reader; although, the interface is slightly different.

Pull down the 'File' menu and select 'Print'.
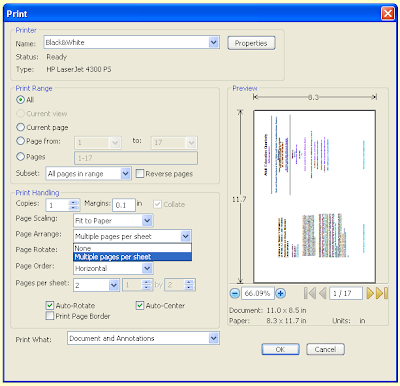
On the 'Print' window pull down the drop-down list marked 'Page Arrange' and select 'Multiple pages per sheet'.


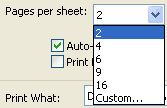
Select how many pages you want to appear on each printed sheet. As with Acrobat, two is probably the best choice.

Set the page order. Usually this will be 'Horizontal'.

Make sure that 'Auto-Rotate' and 'Auto-Center' are ticked.

Tick the 'Print Page Border' box if you want to have each page appear in a box; although you may consider this to be a waste of ink.

Foxit Reader also has a preview of what the first page will look like on the Print window, so you can confirm that your selections are correct.

Sunday 8 February 2009

Make any window stay on top

Some applications have an option to make their windows stay visible even when you select another application. While using my webcam on Skype the other day I went searching for the option to make the webcam window stay on top but I could not find it anywhere. There are a number of free tools available to apply this feature to all windows, but I settled on Tummy's Power Menu 1.5.1.

Not only does Power Menu add the 'stay on top' option to all windows, but also it allows you to set the transparency of the window to make it see-through. This software also enables you to minimise an application to the Systray (the collection of icons near the clock on the Taskbar). Power Menu even lets you adjust an application's priority within windows, although I do not recommend setting this unless you are confident that you know what you are doing.

Power Menu works on all modern versions of Windows including XP and Vista. Once you have installed the software you can access the new features by pulling down the control menu of a window by clicking on its icon at the right hand of the title bar. The following images demonstrate Power Menu's excellent features:-

The extra features on the control menu.

A semi-transparent Notepad.

Firefox minimised to the Tray. Click on the icon to restore it.

Tuesday 27 January 2009

The 13th Carnival of Computer Help and Advice

Welcome to the thirteenth monthly Carnival of Computer Help and Advice - a digest of recent blog articles about making interaction with computers safer and easier.

We start this month with a free e-book at BookFundas.com entitled Microsoft Windows XP Registry Guide: "This title for power users and IT professionals is the authoritative source for information on the Windows XP registry and how to modify it to suit your administrative and personal needs. The Windows registry contains profiles for each user of a computer plus information about system hardware, installed programs, property settings, and more."

With Windows XP approaching the end of its production life, Pass The Boll presents a review of Windows 7 - A Promising OS From Microsoft. While we are on the subject of operating systems, The Software Junkie has written a blog post for those of you who have tried the Ubunti 8.10 Intrepid Live CD only to find that OSX will not boot correctly: Ubuntu 8.10 Intrepid Live CD - Mac Boot Error Fix.

"My blog covers computer-related repetitive stress injuries, ergonomics, software, and peripherals. I put this list together for folks who might be thinking of buying voice recognition software." So writes Lindsay B about the 7 Signs It's Time to Try Voice Recognition Software post at Ergoblog.

Malicious attempts to capture our secured information on the web are on the increase. To help us protect ourselves Richard of Geek-News.Net offers his Tips To Avoid Twitter Phishing.

While Twitter's popularity is increasing as a means to communicate with each other, Jam Ward looks at a swiss army penknife of an application that enables us to communicate via a plethora of systems in The Best Pidgin Hacks & Mods at Jam's Ubuntu Linux Blog.

Finally this month, a welcome return of Andrew Edgington with A Preview of Photoshop Elements 7 Part 1 posted at Learn Adobe Elements.

If you would like to host the next carnival then please leave a comment on this post or use the contact form over at our Blog Carnival page where you can also submit your blog posts for inclusion. Don't worry, if you don't want to write the Carnival post I can do it for you.

More next month.

Friday 23 January 2009

Faster word processing revisited

Do you wish to be able to use your word processor more efficiently? Would you like to be able to edit a piece of text without having to reach for the mouse every few seconds? If your answer is 'yes' then this selection of time-saving keyboard shortcuts are for you. They should work in any text editor on Windows (and possibly on other operating systems too), whether you are using a word processor or a comments box on a web page.

I have included a text box as part of this article so you can play around with the various key combinations. For those interested, the text in the box is the opening paragraph of Candide by Voltaire.

We will start with quick navigation links.
  • The Home key will move the cursor to the beginning of the line (on most keyboards this key is in a collection of 6 keys located above the cursor keys).
  • The End key will, unsurprisingly, move the cursor to the end of the line.
  • If you hold down Ctrl and press Home, the cursor will move to the beginning of the document. Ctrl and End will take the cursor to the end of the document.
  • The Page Up and Page Down keys do 'exactly what it says on the tin'; they move the cursor one page up or one page down.

You probably already use the cursor keys (the ones with arrows on) to navigate around your compositions, moving one character at a time. If you hold Ctrl and press the left or right cursor keys you can jump one word at a time, left or right.

You should now be able to whiz around your documents; but what about keyboard shortcuts for selecting bits of the text? To select, simply hold down the Shift key as well as the key combinations I have already mentioned.

  • Holding down Shift and pressing a cursor key will select one character to the left or right, dependent on which cursor key you press.
  • Hold Shift and press Home to select the text from the cursor position to the beginning of a line. Shift and End selects the text from cursor to end of line. Thus, a quick way to select a line of text is to press Home, hold down Shift and press End.
  • Holding down Shift and Ctrl together and pressing Home will select all the text between the cursor position and the start of the document. Holding down Shift and Ctrl while pressing End selects all the text between cursor and end of document.
  • To select the whole document you could hold down Ctrl and press Home to take you to the top; then Shift, Ctrl and End to select to end; however, it is much easier to use the keyboard combination for selecting the whole of a text: Ctrl and A.
  • Holding down Shift and Ctrl and pressing a cursor key will select one word left or right, dependent on which cursor key you press.

So, you can whiz through your document selecting chunks of text as you go. The last selection of key combinations in this article enable you to do stuff to the text.

  • Hold down Ctrl and press C to copy the selected text.
  • Hold down Ctrl and press X to cut the selected text - that is to copy it and delete it.
  • Hold down Ctrl and press V to paste the copied text where the cursor is located.

Whereas, it is easy to remember the key combination for copy (Ctrl+C) the combinations for cut and paste are not so intuitive. When I first started using these particular keyboard shortcuts I remembered the cut combination because the X looks like a pair of scissors, and the V looks a little like an upturned glue pot (a little imagination is required I know).

Play around with all these key combinations in this text box.


Some text boxes allow you to use 'rich text'; that is, text that has extra formatting options such as bold, italic or underline.

  • Hold down Ctrl and press B to make the selected text bold.
  • Hold down Ctrl and press I to make the selected text italic.
  • Ctrl and U will underline the selected text.

Thankfully all three of these are intuitive, so no need for imaginative mnemonics to remember them.

To further increase your productivity while using a word processor you can use your keyboard to access the application's menus too as detailed in this tutorial.

This is an edited version of a post that I originally posted on September 5, 2007.