Showing posts with label Windows GUI. Show all posts

Thursday 24 March 2011

Keyboard shortcut of the week: Windows 7 Taskbar

After a long hiatus, keyboard shortcut of the week returns to 'Bloody Computer!' This week, we will look at new features of the Windows 7 taskbar.

You can open any program on the taskbar by holding the Windows key [shown right] and pressing the item number on the taskbar. For example, to open Internet Explorer on the following taskbar you would press Windows Key + 1. The calculator is Windows Key + 2, and so on.


If Internet Explorer is already running, pressing Windows Key + 1 will open that session. To start a new instance of the web browser press Shift + Windows Key + 1.

You can also shift focus to the taskbar using Windows Key + T. You can then use the left and right cursor keys to cycle through the items and press Enter to open them.

You can pin new programs to the taskbar by right-clicking on the icon and selecting 'Pin this program to the taskbar'. Once the icon is pinned, you can drag and drop it anywhere you like on the taskbar.

Sunday 30 January 2011

Where have all my desktop icons gone?

Windows offers the facility to hide all the icons on your desktop. The default option is to show all desktop icons, but this may be switched off either by accident or on purpose. To change this setting simply right-click on the desktop and a menu will appear.

On Windows XP you need to open up the 'Arrange icons by' sub-menu and then either tick or untick 'Show Desktop Icons'.
On Windows Vista and 7 the option is available in the 'View' menu.

Monday 11 October 2010

How to see the Explorer menus in Windows Vista and 7

As promised some time ago, here is the first post about Windows 7 (and Vista).

Users of XP and earlier versions of Windows who now use Vista or 7 will have noticed that the Explorer menus are no longer shown.


Thankfully there is an easy way to remedy this either temporarily or permenantly. To see the menu bar simply press the Alt key.


If you wish to always have the menus visible, select 'Folder options...' from the 'Tools' menu.


On the 'Folder Options' window, go to the 'View' tab and tick 'Always show menus' and then click the 'OK' button.

Friday 9 October 2009

How to sort the Programs Menu

If, like me, you have a lot of applications installed on Windows XP, it can be time consuming to find the folder or icon for the program that you are looking for on the Start menu. You can sort the contents of the Programs menu into alphabetical order, with the folders listed first and then the applications. To do so open up the Start menu and then the Programs menu. Right-click on any folder or icon and click 'Sort ny Name' on the menu that opens.

Friday 8 May 2009

How to password protect any file in Windows XP

Certain applications, such as Microsoft Word, enable you to password protect your files. Nevertheless, the zip functionality that is built into Windows XP enables the user to password protect any file by compressing it using a password. If you have an alternate compression application, such as WinRar installed then you can also use that to password protect files on any version of Windows.

To do so, right-click on the file you wish to password protect and select 'Send to...' From the sub-menu that pops up select 'Compressed (zipped) folder'


This will create a zip file with the same name as the original file.

Right-click on this zip file and select 'Explore'. This will open the file in a new window. From the 'File' menu select 'Add a password'.

Type the password in twice and click OK

Delete the original file, and for extra safety, empty your 'Recycle Bin'.

You may see the following message if you have another compression application installed. If so, just click 'Yes', and carry on as above.

Friday 6 March 2009

How to pin shortcuts to the Start menu

The left hand side of the Start menu in Windows XP and Vista includes a list of recently used applications at the bottom below the divider, and a list of 'pinned' items at the top, as shown below.

You can add and remove shortcuts to this list of 'pinned' items in two ways. Firstly, you can simply drag-and-drop a shortcut from the bottom list to the top, as shown in the following video. Click on the icon in the lower list and hold down the mouse button while you drag the icon up above the divider.


Secondly, right-click on any shortcut and click on 'Pin to Start Menu'.

You can alter the order of the shortcuts by dragging and dropping them into their new position. To remove a pinned shortcut, right-click on it and select 'Remove from this list'. You can also alter the number of shortcuts displayed on the Start menu.

Windows XP
Right-click on the Start menu and click 'Properties' making sure the mouse pointer is not over an icon. You will then see a window like this.


Click the 'Customize...' button to open the following window.

You can adjust the number of programs on the Start menu here. Other settings on this page include the size of the icons on the Start menu, a button to clear the recently used applications and a way to select the email and web browser applications that are displayed on the menu. Adjust these as you desire and click 'OK' to close that window, and 'OK' again to close the first window.

Windows Vista
Right-click on the Start menu and click 'Properties' making sure the mouse pointer is not over an icon. You will then see a window like this.

Go to the 'Start Menu' tab and click the 'Customize...' button.

You can adjust the number of programs on the Start menu on the following window, as well a variety of other features on the Start menu.


Once you have adjusted the settings click 'OK' on both windows to close them and implement the changes.

Sunday 8 February 2009

Make any window stay on top

Some applications have an option to make their windows stay visible even when you select another application. While using my webcam on Skype the other day I went searching for the option to make the webcam window stay on top but I could not find it anywhere. There are a number of free tools available to apply this feature to all windows, but I settled on Tummy's Power Menu 1.5.1.

Not only does Power Menu add the 'stay on top' option to all windows, but also it allows you to set the transparency of the window to make it see-through. This software also enables you to minimise an application to the Systray (the collection of icons near the clock on the Taskbar). Power Menu even lets you adjust an application's priority within windows, although I do not recommend setting this unless you are confident that you know what you are doing.

Power Menu works on all modern versions of Windows including XP and Vista. Once you have installed the software you can access the new features by pulling down the control menu of a window by clicking on its icon at the right hand of the title bar. The following images demonstrate Power Menu's excellent features:-

The extra features on the control menu.

A semi-transparent Notepad.

Firefox minimised to the Tray. Click on the icon to restore it.

Friday 12 December 2008

Windows Hopping reprise

Hopping Between Windows
Have you ever needed to swap windows while you are using the keyboard? Have you needed to jump quickly from that email you are composing to the report you are supposed to be writing? Then try holding down Alt key and pressing the Tab key. Select the window you want and release the Alt key to bring that one to the front. A little dialog box will open that looks like this in Windows XP or 2000:


And looks like this in Windows Vista:


There is also an alternate way of hopping between windows that does not show this box. Simply hold down the Alt key and press the Escape key (marked Esc) to hop between windows in the order that you opened them. If you hop using this method Windows will leave any minimised windows in that state, it will not restore them like the Alt+Tab method does.

Hopping Within Windows
While we are on the subject of the Tab key, whenever you are filling in a form in a Windows program, the Tab key will generally move the cursor to the next field or button.

To move the cursor back to the previous field hold down the Shift key and press the Tab key.

Filling in a whole form from the keyboard means you get the job done more quickly and more easily, leaving more time available to 'Alt-Tab' back to that blog you were reading.

Try these shortcuts out on the following form. Click on the first field to select it, then tab between fields to your heart's content.

Field1:
Field2:
Field3:
To change the value of this press the space-bar when selected:
To change the value here use the up and down cursor keys:

[This post is an edited version of two that I originally posted on 22 August 2007 & 24 September 2008... I have been very busy writing up an assignment lately, but rest assured there will be more original material here soon]

Sunday 16 November 2008

Jargon Busting: Anatomy of a window (Part 2)

A number of weeks ago I posted an article naming the various elements that you will find in in Windows programs. This is the second part of that series. Unfortunately, whereas in the last post the displayed elements were interactive, in this post they will only be images.

Scroll Bar
A control for shifting the contents of a window left and right on horizontal scroll bars or up and down on vertical ones.


Slider
This control can be used to adjust a value within a limited range. Sometimes the value chosen with the slider will be displayed. On some sliders there will be only a few values that can be chosen, as with the screen resolution selector.


Spinner
The spinner is a combination of a numeric input box and two small buttons with which you can increase and decrease its value.

Tree View
Tree views appear in a variety of forms, but share the same basic characteristics: items containing sub-items containing sub-items and so on. On some tree views each item will have an associated tick boxes. Click on the + symbol next to an item to see the sub-items it contains. The symbol will then change to a -, which you can click to hide the sub-items.

Sunday 19 October 2008

How to run a program every time Windows starts

In a previous post I explained how to stop programs running when Windows starts up, but in this post I will explain how to make one run every time you boot up. There are a variety of ways of telling Windows to run a program when it starts, but using the 'Startup' folder on the Start menu is probably the simplest. For the purposes of this tutorial we will set Windows to run Firefox automatically.

Click on the Start menu and browse to the appropriate sub-menu. Right-click on the icon for the program you want to start automatically, and click 'Copy'.

Now find the 'Startup' folder on the Start menu, right-click on it and click 'Open'.

This will open a new window showing some of the programs that run whenever you start Windows.

Right-click on some empty space in that window and click paste.

If you cannot find the icon for the program you want in the Start menu, but you have it on your desktop then you can copy that one into the 'Startup' folder. You can repeat this process for all the programs you wish to start automatically; however, be warned that the more programs you have running the slower Windows will work.

Tuesday 7 October 2008

Jargon Busting: Anatomy of a window (Part 1)

All the various controls on a Windows program have names that are not always intuitive. In this post I will identify the most common controls and list the various names that they are known by. I will not bother with buttons or menus as everyone should know what they are. All the controls on this post are interactive, rather than just being images.


Text box, Text field, Text Entry, Input Box
A control into which you can type text. It can be a single line as above, or multiple lines as below.

Radio button, Option button
This control enables you to select one of a number of choices.


Male
Female
Check box, Tick box
These either appear singly offering an on/off or yes/no choice, or they offer a chance to select a multitude of options.


What do you own?
Desktop PC:
Laptop
PDA
List box
This control enables you to select one or more items from a list. To select more than one item hold down the Ctrl key while clicking.


Drop-down list
This element allows you to select an item from a list

In the next post in this series I will look at other program controls, such as sliders, spinners, trees and grids.

Wednesday 24 September 2008

Keyboard shortcut of the week: Alternative windows hopping

In a previous post I mentioned that you can hop between open windows by holding down the Alt key and pressing the Tab key repeatedly. A little dialog box will open that in Windows XP or 2000 looks like this:


And in Windows Vista looks like this:


There is an alternate way of hopping between windows that does not show this box. Simply hold down the Alt key and press the Escape key (marked Esc) to hop between windows in the order that you opened them. If you hop using this method Windows will leave any minimised windows in that state, it will not restore them like the Alt+Tab method does.

Monday 21 July 2008

Tweak UI: free MS Power Toy for Windows XP

I should start with an apology for not having posted anything here for a while. I have been rather busy for the last few weeks, but I am back now posting more PC help and advice starting with the most powerful of Microsoft's Power Toys for XP: Tweak UI.

You can download the software from here (or here if you have an Itanium™-based system).

Note: this software is designed for Windows XP (and 2003 Server), some users have reported some success with it on 32-bit versions of Vista, but not on Vista64.

Once downloaded and installed, Tweak UI (UI meaning 'user interface') will appear in your Control Panel. If you run it you will be presented with the following:

If you select a category from the tree-list on the left the right panel will show any relevant tweaks that can be made to the Windows interface. For example, Tweak UI offers some extra settings for the mouse. Click on the + next to 'Mouse' in the tree-list, and then click on 'Wheel' to see the following:


As you can see, I have chosen to use mouse wheel for scrolling 3 lines at a time. Notice that there is a description of what the tweak does, and that this change applies only to the user you are logged on with, not every user as some changes will. Browse through all the settings and see the other tweaks that you can make. Click the 'OK' button to apply the changes and close Tweak UI, or just click the 'Apply' button to see your changes in action while keeping Tweak UI open in case you wish to revert to your previous settings.

If you have any problems with or questions about Tweak UI feel free to leave a comment on this post. Happy tweaking!

Thursday 12 June 2008

Command Window Here: Free MS PowerToy for XP

In the last post I have instructions for using the Command Prompt to navigate to a particular folder; however, there is an easier way to do this in Windows XP by installing a PowerToy (this feature is already available in Vista).

To install this feature, look for 'Open Command Window Here' the list of PowerToys on the right hand side of the page and click on CmdHere.exe to download it (or simply click here - if this links stops working please leave a comment). After installing the software, when you right click on a folder icon, or on the empty space within a folder, you will see a new entry in the menu that opens: 'Open Command Window Here'. Click on this to open up a Command Prompt window that will already be focused on the current folder.

There are a number of other PowerToys available, including the excellent Clear Type Tuner, which was the subject of an earlier post. In future posts on this blog, I will look at some of the other tools available to enhance Windows XP.

Wednesday 4 June 2008

How to save a list of files in a folder

There are a number of programs available that will create a text file from a list of files in a folder, but here is a quick and easy way of doing the same using the Command Prompt.

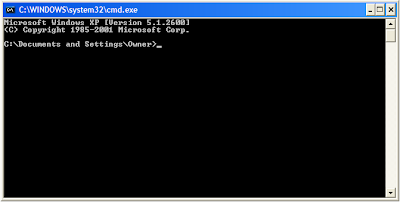
Firstly, open up the Command Prompt (aka the MS-DOS Box). To do this either click on 'Run' in the 'Start' menu, or hold down the Windows key and press R (the Windows key is the one with the Windows logo on). In the box that opens type cmd, and either click the 'OK' button or press the Return key. The Command Prompt application should open, looking something like this.


Secondly, you will need to navigate to the folder which contains the files you wish to list. If it is on a different drive type the drive letter followed by colon (e.g. D:) and hit return. Then type cd (change directory) followed by the path of the folder, for example:

cd c:\documents and settings\owner\my documents


On some versions of Windows you only need to type part of the folder name and then press the Tab key and the Command Prompt will fill in the rest, e.g. type cd c:\docu and press Tab to change the command to
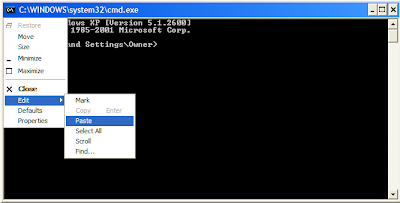
 cd c:\documents and settings.

If you do not know the full path of the folder, you can set Windows Explorer to show it in the address bar or title bar - one of my earlier posts explains how to do this (I would recommend showing the full bath in the address bar). You can copy the path from the address bar and paste it into the command prompt screen by clicking on its icon in the top left hand corner, which opens a drop down menu as shown below.


Once you have navigated to the right folder you can type the command to create a file list in that folder in the form of a text file that can be opened in notepad or your word processor.

Note: Windows Vista includes a feature where you can hold down the Shift key and right-click on the icon of the folder you wish to list the files contained within and select 'Open Command Window Here' from the menu that opens. I will be publishing a post soon which will provide instructions on how to add this feature to Windows XP.


Directory List Command

To create a list of all the files in the folder type dir /a-d /b > filelist.txt and press Return/Enter.

The command includes two switches, /a-d and /b. The first of these stops the dir command. from listing folders; the second prevents the command from showing the extra information you see if you just type dir and hit Return. If you wish the text file to have a different name change it from 'filelist' but remember to put '.txt' at the end so that Windows knows that it is a text file.

The dir command has a variety of other switches, the following command will list the names of all the mp3 files in the current folder and all the sub-folders that it contains:
dir *.mp3 /a-d /s /b > mp3filelist.txt

The *.mp3 part tells the command to only list files with that extension, and the /s sets it to list the files in sub-folders too. Note that the files in the sub-folders will be listed prefixed by the folder name, e.g. 'D:\soulseek\placebo - covers\01 Running up That Hill.mp3'.

If you have a particular requirement for a file list leave a comment on this post and I will look into it for you. Also, if anyone is interested in learning more about the various commands and programs available in the Command Prompt please leave a comment.

One last point, you can use > filename.txt to send the results of any command to a text file, which can be very useful if you have to pass information on to a technician.

Now you can impress your friends and co-workers with your 'old skool' techie skills.

Monday 2 June 2008

How to make Windows quicker: lose the fancy look

There is a price to be paid for fancy effects and other visual features in Windows: a reduction in performance. Nevertheless, by switching off the knobs and whistles you can make Windows run that little bit faster.

To choose which visual features to disable, you need to open the 'System Properties' dialogue. To do this either right-click on 'My Computer' on your Desktop and select 'Properties' from the menu that opens, or hold down the Windows key and press the Pause/Break key. Once you have 'System Properties' open, go to the 'Advanced' tab, and click on the 'Settings' button in the 'Performance' section.

This will open up the 'Performance Options' dialogue box. Make sure you have the first tab selected: 'Visual Effects'. On this page you will see a set of four options at the top. By default it is set to 'Let Windows choose what's best for your computer' but you can also choose to have it select settings for 'best appearance' (where all effects switched on) and 'best performance' (where all effects are switched off). The fourth option lets you decide which effects you want to have activated and which ones you do not. You can have a play around switching these off and on and clicking the 'Apply' button to see how they affect Windows. When you are happy click 'OK'

Thursday 24 April 2008

Folder types: Music, Pictures, Videos, Documents, etc

Windows Explorer has different looks for different folders depending on the type of files contained within them. The bar down the left hand side of the Explorer window will have different content - as shown below - and the files in the folder will be displayed in different ways.


Sometimes Windows selects the wrong folder type, or you may wish to change the style of the folder for some other reason. To do this you can either select 'Customize this folder...' from the 'View' menu, or right-click on some space in the folder and select 'Customize this folder...' from the menu that opens - as in the following image.


This will open up the 'Properties' dialogue box and take you to the 'Customize' page on which you can change the folder type as well as the pictures and icon that Windows displays for this folder. There are a variety of folder types that can be selected from the drop-down list. When you are done, click the 'OK' button.


Note: You cannot change these settings for the root directory on a hard-drive. That is, you cannot customize the top level of the C:/ drive or any other hard-drives that you may have installed.

Thanks to JohnGuru at The Ivory Tower for pointing this tip out to me.

Thursday 20 March 2008

How to install new fonts

There are many web sites from which you can download extra fonts for free, such as 1001 Free Fonts, Urban Fonts and many more. The downloaded fonts will be in a zip file, so the first step is to unzip them to your 'Desktop' by simply dragging the font file there. There is no need to copy the text documents that are in the zip file to the 'Desktop'.

Once you have copied all the new fonts you wish to install onto your 'Desktop' you can install them. To do this open up the 'Control Panel'. Your control panel will either be set to the new 'Category views' on XP or Vista or the old 'Classic view'. I will deal with each method of opening the font installation program separately. Vista users can simply right-click on each font file and click on 'Install'; users of other versions of Windows have a few more hoops to jump through.

XP Category View
Click on 'Appearance and Themes' to open that category.
Click on 'Fonts' in the 'See also..' list on the left of the window. This will open the 'Fonts' folder.


Classic View

In the 'Classic View' double click on the 'Fonts' icon to open the 'Fonts' folder.

In spite of the varied ways of opening it, the font installation program has remained unchanged for ages and is the same in all current version of Windows.


To open the font installer pull down the 'File' menu and select 'Install New Font...' to open the 'Add Fonts' tool.


To browse to your 'Desktop' double click on 'c:\', then double-click on 'Documents and Settings', then double click on your user-name (if you don't know it, try all of them), and finally double-click on 'Desktop'. This should then add all the fonts you unzipped to the list.


Click on the 'Select All' button and then click on the 'OK' button to install the fonts. They should now be available in all your applications.

It is worth keeping copies of the font files you saved on your desktop somewhere, so that you can reinstall them if you ever have to reinstall Windows on your PC. If you are not concerned about this you can delete the font files from your 'Desktop'.

Addendum
Thanks to vaibhav for pointing out that you can copy the fonts straight to the 'Fonts' folder.

So, the quickest and easiest way to install a new font is to open the 'Fonts' folder as described above, and then drag the font file from the zip file and drop it in the 'Fonts' folder.

Alternatively, unzip a selection of font files to the 'Desktop', then select and copy (Ctrl + C) them all. Open the 'Fonts' folder and pull down the 'Edit' menu and select 'Paste', or right-click the background of the 'Fonts' folder and select 'Paste' from the drop-down menu, or just hold down Ctrl and press V (if there is one way of doing something in Windows then there are probably half a dozen ways of doing it).

Monday 25 February 2008

Windows Folder Options Explained (Part 4)

Continued from part 3...

File Types
This tab contains a list of all the file types that Windows knows about and which programs are configured to open them if you double-click on their icons.


As the image shows, if a .doc document is double-clicked on it will open in MS Word. You can change the program that is associated with a file type by selecting its entry and pressing the 'Change...' button.

Occasionally you might want to delete file types from the list, if you do not use files of a certain type any more. Highlight the entry for the file type and press the 'Delete' button. This will reduce the size of the Registry (a file that contains most of the settings for Windows and other applications), but not by enough to have a significant impact on performance. So, the chances are that you will probably want to leave this list alone.

There is an option to create a new file type for the list, using the 'New' button, but frankly, you are better off just double clicking on a file of the new type and selecting a program to associate it with in the normal way.

Finally there is an 'Advanced' button, which is used to change the way that Windows creates, opens, and prints files of the selected type. It would be best to leave these settings alone unless you know what you are doing, and an explanation of these settings is beyond the scope of this series of articles.

Some versions of Windows will have a fourth tab in the Folder Options dialog box, called 'Offline Files'. This will not be covered within this series of articles as this would require me dealing with the larger issue of folder synchronisation. Something that I may return to in the future.