Sunday, 18 May 2008

Bloody Computer! reaches the ton

This hundredth post on Bloody Computer! reviews the story so far (as the fiftieth post did at the beginning of this year).

Top 3 Most Read Posts
1. Free Lightweight Alternatives to Bloatware: 805 views
2. Windows Task Manager Explained: Part 1: 466 views
3. Where has all my hard-drive space gone?: 427 views
Data from the excellent Google Analytics

Top 3 Most Commented on Posts
1. Keyboard shortcut of the week: Quickly Open Link in New Tab: 17 comments
2. Keyboard shortcut of the week: The Case of MS Word: 11 comments
3. How to install new fonts: 9 comments
Thank you for all your feedback

Top 3 Most Dugg Posts
1. Bring files back from the dead: 12 diggs
=2. Folder types: Music, Pictures, Videos, Documents, etc: 7 diggs
=2. Keyboard shortcut of the week: Quickly Open Link in New Tab: 7 diggs
=3. Four Hardware Tips: CD/DVD drives and scanning: 6 diggs
=3. Recovering text from Word documents (Part 1): 6 diggs
Data from Digg (the whole countdown is here)

Top Ten Commenters
1. Eerik (3)
=2. MS (2)
=2. Jo3Black (2)
=2. Magdalen Islands (2)
=2. skyllo01 (2)
=2. Ashutosh Mishra (2)
=2. Davidlind (2)
=2. erickia (2)
=2. Laura (2)
=2. Computer and Electronics Hot Deals (2)
Data from the fancy widget by Blogger Buster (now in the left hand column)

Many thanks to all my regular readers, and here's to the next 100 posts.
K

Friday, 16 May 2008

Keyboard shortcut of the week: create your own

If you have a program that you use a lot you can create your own combination of keys to run it. In this tutorial we will set up a keyboard shortcut for Microsoft Word.

The keyboard combination is associated with a shortcut rather than the program itself. So we need to locate a shortcut for Word. You may have one on your desktop, if not you will have one in your Start menu. It is generally best to associate the combination of keys with the shortcut in the Start menu because if the shortcut is deleted the key combination will not work any more, and this is less likely to happen with the Start menu shortcut.

Click on the 'Start' button, then hover over 'Programs', then over 'Microsoft Office', then right-click on the icon for Word and select 'Properties' (or do the same on your desktop icon if you wish to use that one instead).


Go to the 'Shortcut' tab on the 'Properties' dialogue box and click on the text box next to 'Shortcut key' where it says 'None'. Hold down Ctrl and Alt keys and press W.


From now on, whenever you press Ctrl, Alt and W Word will open. You can set up shortcuts for as many programs as you like, as long as the combination is not used elsewhere in Windows. Each combination must include two of the following: Ctrl, Alt and Shift, and one other key.

Monday, 12 May 2008

Multiple Series of Page Numbers

Sometimes a MS Word document requires separate numbering systems for different sections. The introduction may have to be numbered with Roman numerals (i, ii, iii, etc), while the main body of the text may require normal Arabic numerals (1, 2 3, etc). There is a way of achieving this in Word without having to save the different sections as different files.

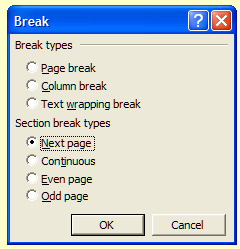
To start, you have to let Word know that the text is split into different sections. To do this, move the cursor to the end of the first section. To mark the end of that section pull down the 'Insert' menu and click on 'Break...' This will open a dialogue box offering a variety of breaks that you can insert. Select 'Next page' from the 'Section break types' list. Click 'OK' to close the dialogue box.

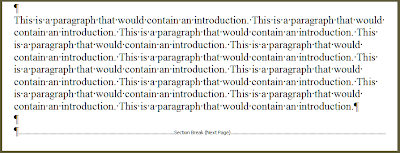
This will move the cursor onto the next page. To see the 'Section break' click on the 'Show/hide paragraph' toolbar button (pictured left). If you wish to add any text to the first section it must be put before this section break.


You can now add the page numbering. To do this we need to access the header or the footer (the areas above or below the text where the page numbers will go). In this tutorial the page numbering will be put in the footer. Pull down the 'View' menu and select 'Header and Footer'. Notice how the text turns grey, how two boxes appear on each page, and the appearance of a 'Header and Footer' toolbar. Click inside the footer for Section 1 and then on the 'Insert Page Number' button on the toolbar (shown right).

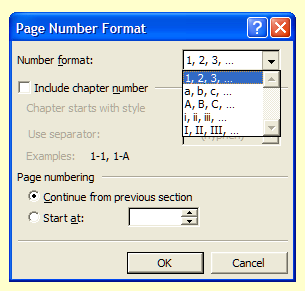
You will see that page numbers are now shown in the footer. You can align page numbers as if they were normal text. To change the format to Roman numerals click the 'Format Page Number' button (shown left). A dialogue box will open, pull down the 'Number format' list, select 'i, ii, iii, ...' and click on 'OK'.

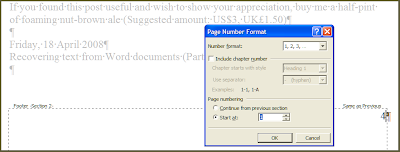
You now need to reformat the numbers in the second section. Move down to the section 2 footer and click inside it (you will notice that the page numbers are still in Arabic numerals in this footer). Click on the 'Number format' button and in the 'Page numbering' section select 'Start at' and make sure the number is '1'. Click 'OK'.


To finish click the 'Close' button on the 'Header and Footer' toolbar.

Wednesday, 7 May 2008

Wireless networking problems: quick repair

Wireless networking, or wi-fi, has become a popular means of connecting to the Internet, but it can be problematical. There are all manner of things that can go wrong but there is a quick way to deal with many of the problems that do occur.

Locate the wireless icon (as pictured left) in the systray (the collection of icons by the time) and right click on it. This will open a menu. Click on 'Repair' - or 'Diagnose' if you are using Vista.

If you cannot see this icon go to 'My Network Places' and click on 'View Network Connections' in the 'Network Tasks' section.


This will take you to a list of your network devices. Right-click on the wireless connection icon and select 'Repair' from the menu.

Vista users will be able to diagnose their connections by clicking on 'Networks' in the Start Menu and then clicking on 'Diagnose Internet connection'.

Wednesday, 30 April 2008

Keyboard shortcut of the week: Quickly Open Link in New Tab

This tip should be of interest to all the Entrecard chain-droppers out there (you know who you are). It works in Internet Explorer (version 7 and later), Firefox, and Safari.

If you hold down the Ctrl key when you click on a link on a website the browser will open the linked page on a new tab, saving you having to right-click on the link and selecting 'Open Link in New Tab' (or 'Open in New Tab' on IE).

Sunday, 27 April 2008

The Fourth Carnival of Computer Help and Advice

Welcome to the fourth monthly Carnival of Computer Help and Advice. As ever many blog authors contributed their posts, and as ever limitation of space means that some did not make it into the carnival.

We start with a carnival regular: Andrew Edgington writes posts on the subject of digital imagery. In Edit Your Digital Photos Andrew says Emailing your photos? A few tips. For those of you who use Photoshop he writes the Learn Photoshop Now blog, which has included the following recent posts: Brightening Dark Shadows; Screen Blending Mode; and, Create an image with a transparent background.

Eerik Toom presents more general advice for Windows users with How to make an older program run in Windows XP posted at Cool Windows XP tips & tricks. More useful advice from Jon Knight who lists 5 Things You Can Do to Start Your PC Faster at his Wordout blog. On the subject of lists, Paul Wilcox of Security Manor explains The Three Things You Need To Protect Against Internet Security Risks.

Phil for Humanity eulogises on The Merits of Two Backups - very good advice, the more backups the better. For all the webmasters out there Fred Black praises Google WebMaster Tools at his Internet Business Blog. Finally, ChristianPF advises us on How to watch HD TV on your computer at ChristianPF.com.

If you would like to host the next carnival leave a comment on this post or use the contact form over at our Blog Carnival page where you can also submit your blog posts for inclusion.

More next month.

Thursday, 24 April 2008

Folder types: Music, Pictures, Videos, Documents, etc

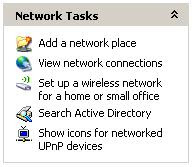
Windows Explorer has different looks for different folders depending on the type of files contained within them. The bar down the left hand side of the Explorer window will have different content - as shown below - and the files in the folder will be displayed in different ways.


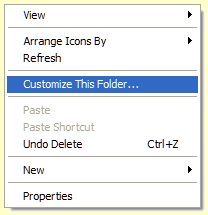
Sometimes Windows selects the wrong folder type, or you may wish to change the style of the folder for some other reason. To do this you can either select 'Customize this folder...' from the 'View' menu, or right-click on some space in the folder and select 'Customize this folder...' from the menu that opens - as in the following image.


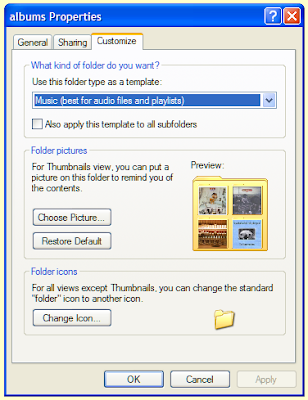
This will open up the 'Properties' dialogue box and take you to the 'Customize' page on which you can change the folder type as well as the pictures and icon that Windows displays for this folder. There are a variety of folder types that can be selected from the drop-down list. When you are done, click the 'OK' button.


Note: You cannot change these settings for the root directory on a hard-drive. That is, you cannot customize the top level of the C:/ drive or any other hard-drives that you may have installed.

Thanks to JohnGuru at The Ivory Tower for pointing this tip out to me.