Saturday, 23 February 2008

Windows Folder Options Explained (Part 3)

Continued from part 2...

View Settings continued


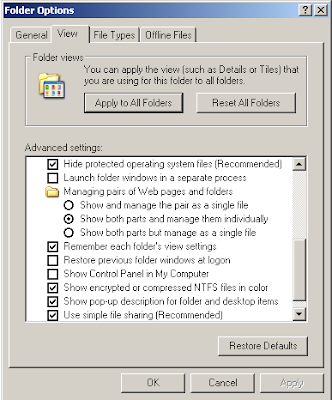
Hide protected operating system files (Recommended)
This option is selected by default, to protect users from themselves, as is explained in the warning message that appears if you try to switch it off.


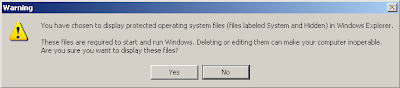
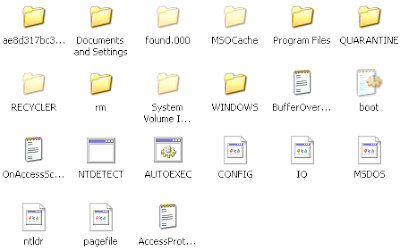
If you click 'Yes' on this dialog box you will be able to see these special system files. The image below shows various system files that are required by Windows to run, such as 'pagefile' which is the swap file which Windows users to manage memory. As the setting suggests, most users will want to leave this option selected.


Launch folder windows in a separate process
This setting, if selected, changes the way that Windows runs different instances of Explorer by running them in separate processes, so if one crashes the others should continue running. You may want to select this but according to user experience it seems to make little difference.


Managing pairs of Web pages and folders

This setting is made available when MS Office XP or 2003 is installed. It effects the way that web pages are saved by Internet Explorer: the default option - 'Show both parts and manage them individually' - saves the web page along with all the files it needs to operate in a folder and these can be manipulated like any other files; however, the other options 'Show and manage the pair as a single file' and 'Show both parts and manage as a single file' link the file and folder in such a way that if one is moved or deleted the other will be treated the same. The last of these options hides the folder which contains the associated files. This is a rather confusing option and is probably best left well alone.


Remember each folder's view settings
This setting is pretty self explanatory. If selected it will mean that each folder will retain whichever display options were applied the last time you accessed it in Explorer.


Restore previous folder windows at logon
If selected, this option will mean that Windows will open all the Explorer windows that you had open when you shut down or logged off your computer previously. Handy if you have to reboot a lot.


Show Control Panel in My Computer
Another self explanatory option. If selected the 'Control Panel' icon will be visible when you view 'My Computer' in Explorer.


Show encrypted or compressed NTFS files in color
NTFS is one of the file systems available in the various versions of Windows and is more feature-rich than the more common file system: FAT32. It includes the facility to compress files (like in zip files) in order to save hard drive space and the ability for the user to encrypt files so that other users will only see gibberish if they open them. If this option is selected the details about compressed files will be blue and those for encrypted files will be green.


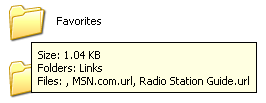
Show pop-up description for folders and desktop items
If this option is turned off then the yellow pop-up descriptions that appear when the mouse pointer hovers over a file or folder, as shown below, will no longer appear.


Use simple file sharing (Recommended)
If you wish to have more control over the way that you share files and folders with other users on your network you can switch this option off. For the vast majority of users is inadvisable to change this option. If you have the need for different users to able to access different files you can use this option.

The last part of this series will explain the File Types tab.

Friday, 22 February 2008

Windows Folder Options Explained (Part 2)

Continued from part 1....

View Settings
The 'View' tab has two sections. In the first section, 'Folder Views' you can either set Explorer to show all folders according to the current settings using the 'Apply to All Folders' button; or, by clicking the 'Reset All Folders' button, Explorer can be set to display folders as they were when Windows was first installed - this excludes any changes made to the toolbars.


The second section has a number of 'Advanced settings' to change the look and the behaviour of Explorer.


Automatically search for network folders and printer
If this setting is selected Explorer will hunt round the local network for any shared folders or printers. The effects of this setting will be negligible for home users or anyone who is not on a large local area network within a company or other organisation.


Display the size information in folder tips
If this setting is ticked, Explorer will show the size of the contents of a folder if you hover the mouse over it. As shown in this picture:


Display simple folder view in Explorer's Folders list
This setting affects the way that the folder view appears. You can show the folder view by clicking on the 'Folders' button on the toolbar.

The normal folder view looks like this:


The simple folder view looks like this (note that the dotted lines are not visible):


With the simple folders view option is selected when you select a folder in the list Explorer will automatically expand a list of all the sub-folders it contains and will collapse any other lists. If the normal view is selected any explanded lists will be left open when another folder is clicked.


Display the contents of system folders
A number of folders on Windows are classified as system folders, like the 'Windows' folder and the top level of the system drive (usually the 'C' drive). By default the content of these folders is hidden, and if you open them in explorer you will see the following:


If you click on 'Show the contents of this folder' you will then be able to see its contents, or alternatively if you select the 'Display the contents of system folders' option then the content of all system folders will be viewable.

Display the full path in the address bar
This setting shows the name of the current selected folder and the names of all the folders it is contained within in the address, like so:


From this we can see that the 'admin' folder is contained within the 'Documents and Settings' folder on the 'C' drive.

Ordinarily the address bar would only read 'admin'.


Display the full path in the title bar
This is much the same as the last setting, except that the full path can be shown in the title bar, as follows:


Do not cache thumbnails
You can change between various views within Explorer by using this drop down menu.

If thumbnail view is selected Explorer will display a small version of any images that the folder contains, as shown in the next image. If there are a lot of images in the folder, it may take Explorer a while to show them all, if this setting is selected. If it is not selected Explorer will create a small file in the folder which will contain the thumbnail information, meaning it only needs to read this file rather than make new thumbnails from all of the images in the folder.

If you are running low on hard drive space you may wish to recover the space taken by these files.


Hidden files and folder
Some files and folders are hidden from view by default and some can be hidden by choice. This setting can be used to make these files and folders visible. If 'Show hidden files and folders' is selected then all hidden files will be displayed as faded items, as shown here:

There are several hidden folders shown above including 'Application Data' and 'Local Settings', and a couple of hidden files, such as ntuser.dat.


Hide extensions for known file types
This option is selected by default, and as such all files will be displayed as follows:

I prefer to have Explorer show me the whole filename including the extension, which is the short code, usually three letters, at the end of the filename that lets Windows know what application to open it in.

If Windows has not been told what program to use when a file with a certain extension is double-clicked, it will show the extension anyway.

I will explain the remaining settings on the 'View' page in the next part of this series of articles.

Thursday, 21 February 2008

Windows Folder Options Explained (Part 1)

In the 'Tools' menu of any Explorer window there is a 'Folder Options' item. This opens a dialog box that enables us to change the behaviour and the look of Explorer windows. This series of articles explore these various settings. The first part will deal with the 'General' tab.

Note: This article refers to Windows Explorer, the in-built file manager program, not to Internet Explorer, the web browser.

General Settings
The 'General' page has three settings, and a 'Restore Defaults' button that you can press to return to Windows' original settings.


Tasks

The first setting, 'Tasks', can be used to either show or hide the left hand pane in Explorer windows. The default setting - 'Show common tasks in folders' -will make Explorer windows look like this:


Selecting 'Use Windows classic folders' will make the windows look like this:


Browse folders
This setting can be used to change the way that Explorer responds to a double-click on a folder. If you have 'Open each folder in the same window' set, when you double click on a folder icon the current Explorer window will show the contents of that folder. This is the default setting for more recent versions of Windows; older versions defaulted to the other setting - 'Open each folder in its own window'. If this is selected then a double click on a folder will result in a new window opening up showing the contents of that folder. All fairly self explanatory.

Click items as follows
You can change the way that Windows responds to clicks on icons with this setting. The default is 'Double-click to open an item (single-click to select)'; however, you can make Windows behave like a web browser, that is, it will open a file when you click on it once. To do this select 'Single-click to open an item (point to select)'. This has two sub-settings, which change the way that the icons appear. They will look like the following image all the time if the 'Underline icon titles consistent with my browser' option is elected, or only when you hover the mouse pointer over them if the 'Underline icon titles only when I point at them' option is selected.

I recommend that you leave this setting as default.

The next article will look at the first collection of the settings on the 'View' tab.

Tuesday, 19 February 2008

Freeware round-up

To celebrate six months of Bloody Computer! I have decided to list all the freeware software mentioned here blog so far (partly to prompt me to update the 'Quality Freeware' list in the left-hand column - now renamed 'Recommended Freeware') So, without further ado, here is the list...

Audacity: audio file editor.

AVG anti-virus free edition: anti-virus software.

Beneton Movie GIF: An application to create animated GIFs from a series of images, like a flickbook.

CamStudio: record what you see on your screen.

CCleaner: removes many non-essential files that Windows and other programs leave on your hard-drive.

dBpoweramp: convert audio files from one type to another.

dscaler: view television on your PC, if you have the appropriate hardware.

Foxit Reader: a fully featured PDF reader and a much slimmer alternative to Adobe Acrobat.

FreeUndelete: a user-friendly program to recover deleted files.

The GIMP: a fully featured image editor developed for linux but available for Windows

IcoFX: an icon creator and editor.

IrfanView: an image viewer with few editing features, and including a batch process feature, with which you can change the format of many files in one go.

mp3gain: balance the volume levels of a selection of mp3 files.

Paint.net: a friendly and intuitive image manipulation tool with many of the features found in commercial image editing packages.

PC Inspector's File Recovery: a powerful application for resurrecting deleted or lost files, and faulty drives.

Picard: provides an interface to search the MusicBrainz database and use the information to rename and set tag information on audio files.

Real Alternative: enables you to play RealMedia files without installing RealPlayer.

Spyware Terminator: protect your PC from spyware and other malware.

Startup Control Panel: provides a means to manage which programs run automatically when Windows starts.

TreeSize: a program that provides a graphical representation of how much hard-drive space each folder is using.

VideoLAN VLC media player: multimedia player (plays most video types without need to install extra codecs).

Virtual Dub: video editing and conversion software.

Winamp: a popular mp3 player developing a large user community.

If you wish to see the posts associated with these applications including tutorials for some of them click here.

Friday, 15 February 2008

How to defrag your drive efficiently

If your computer is running slowly you may have been told to defragment your hard drive. This because as large files are saved to the hard-drive they are often broken up into file fragments and stored in the gaps between other file fragments. This increases the time that Windows takes to access your files.

To check whether your drive needs to be defragmented go to My Computer, right-click on the drive's icon, and select 'Properties' from the menu. Go to the 'Tools' tab on the dialog box that opens. Click the 'Defragment now' button to open the defrag program. Click the 'Analyse' button to get a report. Do not defrag yet, even if the software says that the drive needs defragmenting.

In order to get the most out of the defragmentation process it is best to do a little preparation beforehand. Firstly, close all the applications you are running and reboot your PC. When you are logged back in, go to your web browser and clear out the cache of files. Instructions are available on this site for doing this in Internet Explorer and Firefox. There is an excellent freeware application called CCleaner that will remove many non-essential files that Windows and other programs - including IE and Firefox - have left all over your hard-drive, you may want to download it and use it to give your drive the once-over. Now is also a good time to remove any other programs and files that you don't need any more.

You can now go back to the defrag application by following the above instructions and run the 'Defragment' button, safe in the knowledge that you will be getting the most out of the process.

Note: it is best to not use the PC while it defragments the hard-drive. The process can take quite a while, so it may be worth closing any applications that are running, including those in the systray to speed up the process. If you stop your anti-virus and other protective software it is best to disconnect the PC from the Internet.

Tuesday, 12 February 2008

Keyboard shortcut of the week: Explorer

A short and sweet post today, after so many lengthy ones.

Here is a shortcut that I have mentioned in passing before: to open Windows Explorer (the Windows file browsing software) hold down the Windows key (the one with the Windows logo on it) and press E.

Note: this may not work if you have certain applications open, to remedy this hold down the Windows key and press D then E.

Sunday, 10 February 2008

Tag those audio files and show them to the World

If you have a large collection of MP3s, WMAs and other audio files, you probably have quite a few where the tag information isn't set up properly. In other words, they don't come up with the correct track name or artist in your media player.


Editing these tags manually can be a laborious task, but fear not, the contributers at MusicBrainz offer a solution to your problem. As they say themselves:
MusicBrainz is a community music metadatabase that attempts to create a comprehensive music information site. You can use the MusicBrainz data either by browsing this web site, or you can access the data from a client program — for example, a CD player program can use MusicBrainz to identify CDs and provide information about the CD, about the artist or about related information. You can also use the MusicBrainz Tagger to automatically identify and clean up the metadata tags in your digital music collections.

The website has a number of applications that you can download which access the database. The one I found most useful was Picard, which provides an interface to search the database and use the information to rename and tag the audio files with the correct information. I didn't find Picard particularly intuitive to use; however, the authors have provided some quality documentation to instruct users on how the application works. Here are a few images of the software in action. If anyone struggles with the software after reading the instructions, leave a comment on this post and I will record and post a video of how to use it.

Here is that list of badly tagged mp3 files in Picard.

Using the search facility on Picard opens up a listing of matching information on the MusicBrainz website. I navigated to the appropriate album listing, and pressed the green 'Tagger' button.

Picard presented the information in the right pane. I selected the files in the left pane, pressed the 'Scan' button, and when the list in the left pane was empty I pressed 'Save' to make the changes.

Here is the file listing with the correct tag information in place.

I finally decided that I needed to create and correct the tag information on my audio files after becoming sick and tired of some of them not registering with Audioscrobbler, which is the software used on the music based social-networking site LastFM. The software records all the music you play on your computer, and even some portable audio players, and creates charts from the information. You can see my page here. The site enables you to create fancy widgets to put on your blogs, social networking pages and other websites too, like this one:


So get those audio files tagged and let the World that you are obsessed with prog rock.