Friday, 7 December 2007

Tuesday, 20 November 2007

Keyboard shortcut of the week: born to run

You may have noticed that the Start menu has an item called 'Run'. The Run facility is a bit of a throw-back to the days of DOS, when we had to type commands to run programs rather than double click on icons. Nevertheless, it is still a useful tool in the Windows environment.

You can open the Run box by clicking on 'Run' in the Start menu, or you can use the keyboard shortcut: hold down a Windows key and press R.

The Windows keys have this symbol on, and are generally located near the Alt keys.


Once you have opened up the Run box, simply type in a command and hit return. To get you started here is a list of commands and the programs that they open.

calc - calculator
notepad - unsurprisingly this opens the notepad, which is a simple text editor
iexplore - Internet Explorer
firefox - Firefox
winword - Word
excel - (I think you can guess)
powerpnt - PowerPoint

[For an exhaustive list of other commands see this article on FixMyXP.com]

Another advantage of using the Run dialog is that you can quickly browse to a folder on any drive, for example you can open the 'C drive' by typing C: in the box.

The dialog will offer a drop down menu of options, so if you were to type c:\doc it should offer the option to click on c:\documents and settings. If you then type another \ at the end it should present a list of every file and folder in 'documents and settings', although, sometimes this take a little while.

So, use the Run dialog and feel like an 'old skool' techie.

Monday, 19 November 2007

Putting new buttons on toolbars in MS Office

A while ago I wrote an article that suggested that rather than printing directly from web browsers, such as Internet Explorer, it is better to copy the information that you want into a word processor and print it from there. In that article I mentioned the use of the 'Paste Special' in Word, which enables you to remove formatting from the information that you paste. In this article I will explain how to put a button for 'Paste Special' onto the toolbar in word. This technique can also be used to add any of the other available buttons onto the toolbar.

Open up word and right-click on one of the toolbars, which are at the top of the screen below the menu and look something like this:


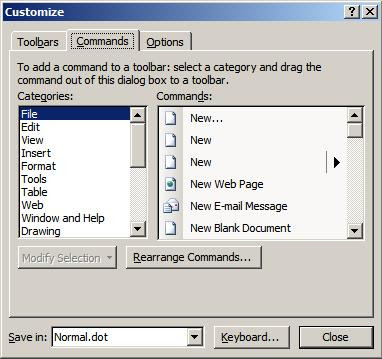
From the menu, select 'Customize...', which will open a dialog box. Click on the 'Commands' tab.


Select 'Edit' from the left-hand menu, because the 'Paste Special' tool is listed in the 'Edit' menu. Scroll down through the list on the right-hand until you see 'Paste Special' then left-click on it and hold the mouse button down. The mouse pointer should change to an arrow pointing at a rectangle with a square to the bottom right, which will have an X in it initially.

Move the pointer up to the toolbars and release the mouse button when it is in a suitable position: next to the normal paste button for example. You will notice that the mouse pointer changed appearance again when you hovered over the toolbar, with the X being replaced with a + to let you know that the new button can be placed there.

Your toolbar should now look something like this:

If you wish to remove a button from the toolbar, follow the instructions above for opening the 'Customize' dialog, but rather than drag from the dialog box to the toolbar, click on the button you wish to remove from the toolbar and drag it into the dialog box.

This process also works in the other Microsoft Office applications such as Excel and PowerPoint.

Monday, 12 November 2007

Sounds & videos in PowerPoint on a different PC

If you are setting up a PowerPoint presentation that has audio or video content, make sure that the media files will be available when you give the presentation. For example, you have a slideshow that plays an mp3 when a certain slide is shown. You must make sure that the mp3 file will be accessible wherever you want to show the presentation, that is, if you are using a USB memory stick make sure that the media files are on the stick before you create the link to them in PowerPoint, or if you are using a CD-Rom, make sure all the media files are in the same folder as the PowerPoint file and then burn them all together in the same folder on the CD-Rom.

Sunday, 11 November 2007

Bring files back from the dead, continued...

The authors of PC Inspector File Recovery recommend that you install it on a different drive from the one you want to retrieve lost files from. This may not always be possible, but if you have a second drive or a USB memory stick, then install the software onto one of these.

Once installed, run the software.

Select your language when prompted.

Click on the 'Recover Deleted Files' tab as shown on the left of this image.

As you can see, I have a number of drives on my PC. On most machines there will only be two drives listed in the list. Select the drive you wish to search for deleted files, usually this will be 'Windows drive C:', and click on the tick.
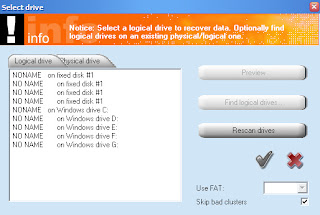
The software may take some time to scan your drive, when finished it will present you with a list of deleted files and folders that it has found. Note that each file's condition is listed and even when the file condition is 'good' it may not be restored in totality.
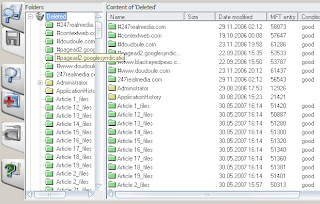
Try to locate the lost file in the list. If you find it, right-click on it and select 'Save as'. If possible select a location of a different hard-drive or a USB memory stick. With luck your file will be restored.
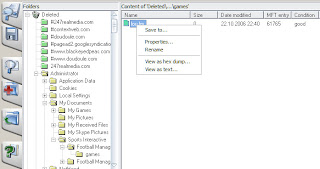
If you can't find your file in the list, try searching for it by clicking on the magnifying glass icon, and typing in the filename of the lost file. The search engine supports wild-cards. Click here for a previous post that explains the use of wild-cards. If the software finds your file you can right-click on it and save it as above.

This guide explores only one aspect of the software as a file recovery tool. Check out the help file and the website for instructions on the other features, but be warned, these tools are not designed for novices.

Note: I had some problems using this software on NTFS drives. To find out if your drive is NTFS or FAT32: go to My Computer select your drive. The file system should appear in the 'Details' section on the left-hand side. Try looking in the drives listed as being 'on fixed disk' as well as those the 'on Windows drive' entries on the 'Select drive' dialog. To select a different drive open the Object menu and click on Drive...

Monday, 5 November 2007

Bring files back from the dead

Even after you have deleted a file, and emptied the Recycle Bin, you may still be able to recover the file. This is because the data in the file has not been removed, at least until the drive is defragmented, rather Windows just ignores the data that is there, treating it as if it was empty space.

The great advantage of this system is that you may be able to recover files that you accidentally deleted since the last time that you defragmented, however, you will need a piece of software that will enable you to reconstruct the file from the raw data. My preferred software for this task is PC Inspector's File Recovery. Whilst free to download and use, it is still a fully featured and powerful piece of software. It is not the most intuitive piece of software ever written, so I will be writing a tutorial later this week explaining how to recover a file using it.

As an alternative, FreeUndelete, is more user friendly, but because I have not used it as often as PC Inspector's File Recovery I cannot vouch for how well it works.

Friday, 2 November 2007

Keyboard shortcut of the week: what`s on the menu?

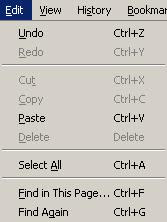
You can open any menu using your keyboard. As you may have noticed, each menu title has one of its letters underlined. To open the menu, hold down the Alt key and press the key corresponding to the underlined letter.

In the case of the above menu, Alt & F will open the 'File' menu, Alt & E will open the 'Edit' menu, and so on.

Once the menu is open, you can use the cursor keys to navigate: up and down will move the focus up and down the list of menu items; the right and left cursor keys will select the next menu to the right or left (except when you have a sub-menu entry focused - more details below). To select a menu item press the Return key.

You will notice that some of the menu entries have letters underlined too. These can be quickly selected by opening the menu and then pressing the key for the underlined letter. For example if you press Alt & E the 'Edit' menu will open, if you then press A then the application will 'Select All' - of course you could just hold down Ctrl and press A, but not all menu entries have another keyboard shortcut associated with them.

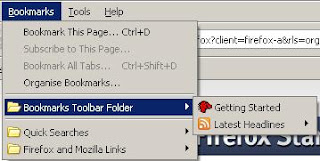
Some menu items have a sub-menu, as with the example to the right. To open these using the keyboard press the right cursor key.

To close an open menu use the Escape key.