Showing posts with label File Recovery. Show all posts

Friday 18 April 2008

Recovering text from Word documents (Part 2)

In the previous part of this article I looked at using the built in text recovery features in MS Word. But, what can be done if this doesn't work? One way to try to recover text from a corrupted file is to open it in Notepad.

To open Notepad click on the Start button, go to 'App Programs', then 'Accessories' and click on its icon. You can then drag and drop the corrupt file into Notepad.

You will then see something that looks like this.


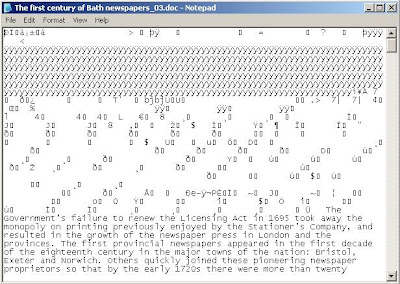
As you can see Notepad is showing some garbage as well as the text of the Word document. The garbage is an attempt by Notepad to display binary (non-textual) information such as images and the like.

Switch on word wrapping, making Notepad remove the scroll bar from the bottom and spread long pieces of text over more than one line. To do this pull down the 'Format' menu and click on 'Word Wrap' if it is not already ticked. This will make the file easier to search through for the text you wish to recover.

You can now either just browse through the file copying and pasting the text you want into a new Word document, or you can use the 'Find...' facility in Notepad to locate the lost text (it is in the 'Edit' menu). Searching for frequently used words like 'the' or 'is' should enable you to quickly find the actual text among all the garbage.

For details on how to quickly select, copy and paste text, see this post.

Wednesday 16 April 2008

Recovering text from Word documents (Part 1)

If Microsoft Word runs into a problem with a file it usually offers a recover option when you open the program the next time. But sometimes this option is not given to you, and you have to try to recover text from a corrupted file manually.

To do this pull down the 'File' menu in Word and select 'Open...' to see the appropriate dialog box. From the 'Files of type' drop-down list select 'Recover Text from Any File'. Then browse to the file you wish to try to recover text, select it, and click the 'Open' button. With any luck Word will extract the text from that file. This process may work with files of types that Word does not support too.

In the second part of the article I will look at what to do if this method fails.

Sunday 11 November 2007

Bring files back from the dead, continued...

The authors of PC Inspector File Recovery recommend that you install it on a different drive from the one you want to retrieve lost files from. This may not always be possible, but if you have a second drive or a USB memory stick, then install the software onto one of these.

Once installed, run the software.

Select your language when prompted.

Click on the 'Recover Deleted Files' tab as shown on the left of this image.

As you can see, I have a number of drives on my PC. On most machines there will only be two drives listed in the list. Select the drive you wish to search for deleted files, usually this will be 'Windows drive C:', and click on the tick.

The software may take some time to scan your drive, when finished it will present you with a list of deleted files and folders that it has found. Note that each file's condition is listed and even when the file condition is 'good' it may not be restored in totality.

Try to locate the lost file in the list. If you find it, right-click on it and select 'Save as'. If possible select a location of a different hard-drive or a USB memory stick. With luck your file will be restored.

If you can't find your file in the list, try searching for it by clicking on the magnifying glass icon, and typing in the filename of the lost file. The search engine supports wild-cards. Click here for a previous post that explains the use of wild-cards. If the software finds your file you can right-click on it and save it as above.

This guide explores only one aspect of the software as a file recovery tool. Check out the help file and the website for instructions on the other features, but be warned, these tools are not designed for novices.

Note: I had some problems using this software on NTFS drives. To find out if your drive is NTFS or FAT32: go to My Computer select your drive. The file system should appear in the 'Details' section on the left-hand side. Try looking in the drives listed as being 'on fixed disk' as well as those the 'on Windows drive' entries on the 'Select drive' dialog. To select a different drive open the Object menu and click on Drive...

Monday 5 November 2007

Bring files back from the dead

Even after you have deleted a file, and emptied the Recycle Bin, you may still be able to recover the file. This is because the data in the file has not been removed, at least until the drive is defragmented, rather Windows just ignores the data that is there, treating it as if it was empty space.

The great advantage of this system is that you may be able to recover files that you accidentally deleted since the last time that you defragmented, however, you will need a piece of software that will enable you to reconstruct the file from the raw data. My preferred software for this task is PC Inspector's File Recovery. Whilst free to download and use, it is still a fully featured and powerful piece of software. It is not the most intuitive piece of software ever written, so I will be writing a tutorial later this week explaining how to recover a file using it.

As an alternative, FreeUndelete, is more user friendly, but because I have not used it as often as PC Inspector's File Recovery I cannot vouch for how well it works.