Friday 15 February 2008

How to defrag your drive efficiently

If your computer is running slowly you may have been told to defragment your hard drive. This because as large files are saved to the hard-drive they are often broken up into file fragments and stored in the gaps between other file fragments. This increases the time that Windows takes to access your files.

To check whether your drive needs to be defragmented go to My Computer, right-click on the drive's icon, and select 'Properties' from the menu. Go to the 'Tools' tab on the dialog box that opens. Click the 'Defragment now' button to open the defrag program. Click the 'Analyse' button to get a report. Do not defrag yet, even if the software says that the drive needs defragmenting.

In order to get the most out of the defragmentation process it is best to do a little preparation beforehand. Firstly, close all the applications you are running and reboot your PC. When you are logged back in, go to your web browser and clear out the cache of files. Instructions are available on this site for doing this in Internet Explorer and Firefox. There is an excellent freeware application called CCleaner that will remove many non-essential files that Windows and other programs - including IE and Firefox - have left all over your hard-drive, you may want to download it and use it to give your drive the once-over. Now is also a good time to remove any other programs and files that you don't need any more.

You can now go back to the defrag application by following the above instructions and run the 'Defragment' button, safe in the knowledge that you will be getting the most out of the process.

Note: it is best to not use the PC while it defragments the hard-drive. The process can take quite a while, so it may be worth closing any applications that are running, including those in the systray to speed up the process. If you stop your anti-virus and other protective software it is best to disconnect the PC from the Internet.

Tuesday 12 February 2008

Keyboard shortcut of the week: Explorer

A short and sweet post today, after so many lengthy ones.

Here is a shortcut that I have mentioned in passing before: to open Windows Explorer (the Windows file browsing software) hold down the Windows key (the one with the Windows logo on it) and press E.

Note: this may not work if you have certain applications open, to remedy this hold down the Windows key and press D then E.

Sunday 10 February 2008

Tag those audio files and show them to the World

If you have a large collection of MP3s, WMAs and other audio files, you probably have quite a few where the tag information isn't set up properly. In other words, they don't come up with the correct track name or artist in your media player.


Editing these tags manually can be a laborious task, but fear not, the contributers at MusicBrainz offer a solution to your problem. As they say themselves:
MusicBrainz is a community music metadatabase that attempts to create a comprehensive music information site. You can use the MusicBrainz data either by browsing this web site, or you can access the data from a client program — for example, a CD player program can use MusicBrainz to identify CDs and provide information about the CD, about the artist or about related information. You can also use the MusicBrainz Tagger to automatically identify and clean up the metadata tags in your digital music collections.

The website has a number of applications that you can download which access the database. The one I found most useful was Picard, which provides an interface to search the database and use the information to rename and tag the audio files with the correct information. I didn't find Picard particularly intuitive to use; however, the authors have provided some quality documentation to instruct users on how the application works. Here are a few images of the software in action. If anyone struggles with the software after reading the instructions, leave a comment on this post and I will record and post a video of how to use it.

Here is that list of badly tagged mp3 files in Picard.

Using the search facility on Picard opens up a listing of matching information on the MusicBrainz website. I navigated to the appropriate album listing, and pressed the green 'Tagger' button.

Picard presented the information in the right pane. I selected the files in the left pane, pressed the 'Scan' button, and when the list in the left pane was empty I pressed 'Save' to make the changes.

Here is the file listing with the correct tag information in place.

I finally decided that I needed to create and correct the tag information on my audio files after becoming sick and tired of some of them not registering with Audioscrobbler, which is the software used on the music based social-networking site LastFM. The software records all the music you play on your computer, and even some portable audio players, and creates charts from the information. You can see my page here. The site enables you to create fancy widgets to put on your blogs, social networking pages and other websites too, like this one:


So get those audio files tagged and let the World that you are obsessed with prog rock.

Friday 8 February 2008

Jargon Busting: OSs, GUIs and Shells

What is an Operating System?

An operating system, or OS, is software that enables you to operate the computer. It manages the opening of files, the monitor display, printing, access to networks, and so on. The chances are you are using a version of Windows as your operating system, but this is not the only OS available. Others include the various versions of linux (such as Ubuntu) which are generally available for free, and OSX, which is the latest operating system for Apple Macs. The various operating systems will tend to look different from one another, they will store files in different ways, and will also run different programs. So, a program written for Windows will not work on Linux unless it is run through an emulator or another piece of software that acts like a translator, such as WINE.


What on Earth is a GUI?

GUI (pronounced 'gooey') stands for Graphical User Interface, and this refers to all the visual elements of an operating system, all the windows, icons, menus, buttons, tick boxes, etc. The user can interact with each of these elements using a mouse or other pointing device, which helped to make computers more accessible and in some ways kicked off the PC revolution.

A graphical user interface can be contrasted with old fashioned command line interfaces (CLIs) like MS-DOS (Microsoft Disk Operating System). If you are interested, you can have a glance at the past by running the command prompt which shows what a command line interface looked like: open a Run dialog ('Run' on the start menu or Windows key & R) and type 'cmd' and press OK. You will then see something like this:


In the days before windows this is what most operating systems looked like. You can relive these bygone ages by typing 'edit' and pressing Enter, this will open the old DOS text editor: a sort of low-tech 'Notepad'. Hold down the Alt key and press the first letter of a menu title to open the associated menu, e.g. Alt & E opens the edit menu. You can even switch to full screen mode by holding down Alt and pressing Enter for that complete retro experience, do the same again to return to Windows.


And shell?

Both GUIs and CLIs are shells. That is, they provide an interface with which the user can manipulate the operating system. On Windows machines the shell is called 'Windows Explorer' although there are alternative shells available for Windows such as the LiteStep GUI.

Monday 4 February 2008

Mouse stopped working: how to reinstall

The first thing to do when your mouse stops working is to check the cable connection. There is no point reinstalling the mouse if it isn't plugged in.

The next thing to try is to reboot the PC. I have written instructions on how to reboot a PC using the keyboard.

If after checking the cables and restarting the PC, the mouse still does not work you should try reinstalling the mouse. To do this you need to open the Device Manager, which can be accessed from the System Properties dialog box.

To open the System Properties dialog box hold down a Windows key (the ones with the Windows logo on) and press the Pause/Break key (on most keyboards this will be in a set of three keys to the right of the function keys).

Alternatively you can minimise all windows by holding down the Windows key and pressing D, then use the cursor key to highlight 'My Computer' and press the Application key to open up a menu, from this menu select 'Properties' using the cursor keys and press Enter.

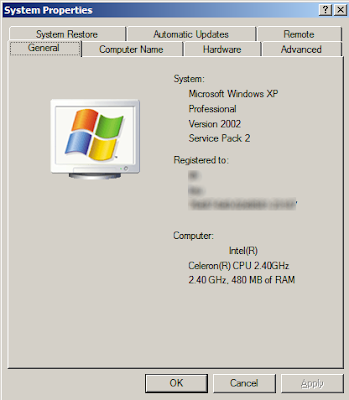
The System Properties dialog will look something like this:


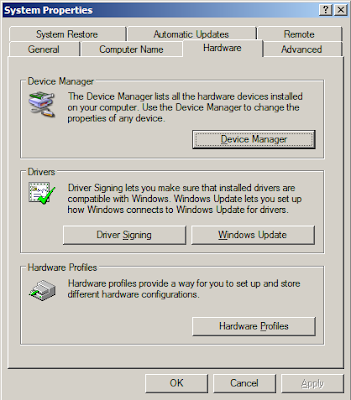
Use the right cursor key to move to the 'Hardware' page. Use the Tab key to move the focus to the 'Device Manager' button and press Enter. If you make a mistake at any time you can press the Escape key to close the System Properties dialog and start again.


This will open up the Device Manager program. To reinstall the mouse do the following:

· Press the Tab key to highlight the computer icon at the top of the list.
· Press the down cursor key repeatedly until 'Mice and other pointing devices' is highlighted (if · you go too far use the up cursor to go back).
· Press the right cursor key to open the sub-list.
· Press the down cursor key to select the mouse.
· Press the Application key to open up a context menu
· Use the down cursor key to move to highlight 'Uninstall' and press Enter.
· You will be asked to confirm this, press Enter.
· Wait for a while and then hold down Alt and press A.
· Continue waiting until the 'Action' menu opens.
· Use the down cursor to select 'Scan for hardware changes' and press Enter.
· Wait for a while, after which Windows should detect the mouse and reinstall it.

I have included a video of this process in action, so that you know what you should be seeing as you follow the instructions.

If your mouse still isn't working after this, plug in different mouse to see if that works on your PC. If it does, plug the problem mouse into another PC, if it doesn't work you know there is a hardware problem with your mouse. If a different mouse doesn't work on your PC, something fundamental is wrong with it and you should seek expert technical advice.

Sunday 3 February 2008

How to reboot Windows using the keyboard

I was writing a post on how to reinstall the mouse using the keyboard when I realised that rebooting the PC using the keyboard would be a required step in the process. So I decided to dedicate a whole post to that topic. I will give a few examples of how this can be done.

Using the Start Menu

· Press a Windows key (the ones with the Windows symbol on as shown right), this will open up the Start Menu.
· Use the cursor keys (the ones with arrows on) to highlight 'Turn off Computer' and press Enter to select it
· A dialog box will open. Use the cursor keys to to highlight 'Shutdown computer', 'Turn off' or whatever your version of Windows says, and press Enter again.

Using the 'three finger salute'

Hold down Ctrl and Alt, and press Delete.

Windows 2000 and XP Home Edition users will be presented with a dialog box with buttons on:
· Use the cursor keys to select the 'Shut Down' button and use Enter to select it.
· Select 'Shut down' from the list using the cursor keys and press Enter one more time.

In other versions of Windows the Task Manager will open:
· Hold down Alt and press U to open the 'Shut Down' menu.
· Use the cursor keys to highlight 'Turn Off' and press Enter.

Hit Alt F4 'till you can't any more

The final method of shutting down that I will explain here is to hold down the Alt key and press F4 repeatedly. This will close every application that is open on Windows and eventually will close Windows itself. You may be asked if you want to save files by some programs, if so use the cursor keys and Enter to get past these dialog boxes.

Friday 1 February 2008

How to rename multiple files

Whenever you want to rename multiple files with the same piece of text and an individual number for each file, as in photo1.jpg, photo2.jpg and so on, you usually either have to do this manually or use a batch rename program. Yet, Windows has the facility to do this, albeit in a rough-and-ready way.

To rename multiple files, select all the files you wish to rename (in a previous post I looked at various ways of selecting multiple files). Then either right-click on any of the files and select Rename from the context menu (this method is demonstrated in the following video), or press F2. Type in the new name of the file - including the file extension if it is visible (eg. .doc, .jpg, etc) - and press Enter. All the other selected files will be renamed with an individual number in brackets. So, if you type in photo.jpg, the next file will be called photo (1).jpg, the next photo (2).jpg and so on.


If you think this is a little messy, you can type in the (1) yourself. For example, if you rename the selected file to photo (1).jpg, the next file will be called photo (2).jpg etc.