There are a number of programs available that will create a text file from a list of files in a folder, but here is a quick and easy way of doing the same using the Command Prompt.
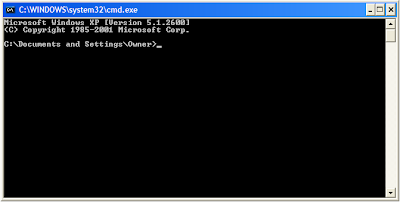
Firstly, open up the Command Prompt (aka the MS-DOS Box). To do this either click on 'Run' in the 'Start' menu, or hold down the Windows key and press R (the Windows key is the one with the Windows logo on). In the box that opens type cmd, and either click the 'OK' button or press the Return key. The Command Prompt application should open, looking something like this.

Secondly, you will need to navigate to the folder which contains the files you wish to list. If it is on a different drive type the drive letter followed by colon (e.g. D:) and hit return. Then type cd (change directory) followed by the path of the folder, for example:
cd c:\documents and settings\owner\my documents
On some versions of Windows you only need to type part of the folder name and then press the Tab key and the Command Prompt will fill in the rest, e.g. type cd c:\docu and press Tab to change the command to cd c:\documents and settings.
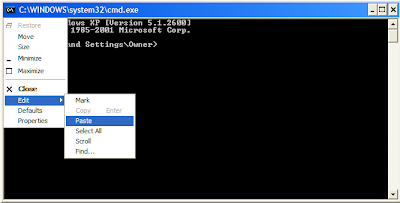
If you do not know the full path of the folder, you can set Windows Explorer to show it in the address bar or title bar - one of my earlier posts explains how to do this (I would recommend showing the full bath in the address bar). You can copy the path from the address bar and paste it into the command prompt screen by clicking on its icon in the top left hand corner, which opens a drop down menu as shown below.

Once you have navigated to the right folder you can type the command to create a file list in that folder in the form of a text file that can be opened in notepad or your word processor.
Note: Windows Vista includes a feature where you can hold down the Shift key and right-click on the icon of the folder you wish to list the files contained within and select 'Open Command Window Here' from the menu that opens. I will be publishing a post soon which will provide instructions on how to add this feature to Windows XP.
Directory List Command
To create a list of all the files in the folder type dir /a-d /b > filelist.txt and press Return/Enter.
The command includes two switches, /a-d and /b. The first of these stops the dir command. from listing folders; the second prevents the command from showing the extra information you see if you just type dir and hit Return. If you wish the text file to have a different name change it from 'filelist' but remember to put '.txt' at the end so that Windows knows that it is a text file.
 The dir command has a variety of other switches, the following command will list the names of all the mp3 files in the current folder and all the sub-folders that it contains:
dir *.mp3 /a-d /s /b > mp3filelist.txt
The *.mp3 part tells the command to only list files with that extension, and the /s sets it to list the files in sub-folders too. Note that the files in the sub-folders will be listed prefixed by the folder name, e.g. 'D:\soulseek\placebo - covers\01 Running up That Hill.mp3'.
If you have a particular requirement for a file list leave a comment on this post and I will look into it for you. Also, if anyone is interested in learning more about the various commands and programs available in the Command Prompt please leave a comment.
One last point, you can use > filename.txt to send the results of any command to a text file, which can be very useful if you have to pass information on to a technician.
Now you can impress your friends and co-workers with your 'old skool' techie skills.
Firstly, open up the Command Prompt (aka the MS-DOS Box). To do this either click on 'Run' in the 'Start' menu, or hold down the Windows key and press R (the Windows key is the one with the Windows logo on). In the box that opens type cmd, and either click the 'OK' button or press the Return key. The Command Prompt application should open, looking something like this.

Secondly, you will need to navigate to the folder which contains the files you wish to list. If it is on a different drive type the drive letter followed by colon (e.g. D:) and hit return. Then type cd (change directory) followed by the path of the folder, for example:
cd c:\documents and settings\owner\my documents
On some versions of Windows you only need to type part of the folder name and then press the Tab key and the Command Prompt will fill in the rest, e.g. type cd c:\docu and press Tab to change the command to cd c:\documents and settings.
If you do not know the full path of the folder, you can set Windows Explorer to show it in the address bar or title bar - one of my earlier posts explains how to do this (I would recommend showing the full bath in the address bar). You can copy the path from the address bar and paste it into the command prompt screen by clicking on its icon in the top left hand corner, which opens a drop down menu as shown below.

Once you have navigated to the right folder you can type the command to create a file list in that folder in the form of a text file that can be opened in notepad or your word processor.
Note: Windows Vista includes a feature where you can hold down the Shift key and right-click on the icon of the folder you wish to list the files contained within and select 'Open Command Window Here' from the menu that opens. I will be publishing a post soon which will provide instructions on how to add this feature to Windows XP.
Directory List Command
To create a list of all the files in the folder type dir /a-d /b > filelist.txt and press Return/Enter.
The command includes two switches, /a-d and /b. The first of these stops the dir command. from listing folders; the second prevents the command from showing the extra information you see if you just type dir and hit Return. If you wish the text file to have a different name change it from 'filelist' but remember to put '.txt' at the end so that Windows knows that it is a text file.
 The dir command has a variety of other switches, the following command will list the names of all the mp3 files in the current folder and all the sub-folders that it contains:
dir *.mp3 /a-d /s /b > mp3filelist.txt
The *.mp3 part tells the command to only list files with that extension, and the /s sets it to list the files in sub-folders too. Note that the files in the sub-folders will be listed prefixed by the folder name, e.g. 'D:\soulseek\placebo - covers\01 Running up That Hill.mp3'.
If you have a particular requirement for a file list leave a comment on this post and I will look into it for you. Also, if anyone is interested in learning more about the various commands and programs available in the Command Prompt please leave a comment.
One last point, you can use > filename.txt to send the results of any command to a text file, which can be very useful if you have to pass information on to a technician.
Now you can impress your friends and co-workers with your 'old skool' techie skills.


