Occasionally it is worth checking to see if you have any temporary files collected. These should be deleted whenever the application that created them is finished with them, or whenever Windows closes down, but bad programming and crashes mean that they can sometimes be left behind.
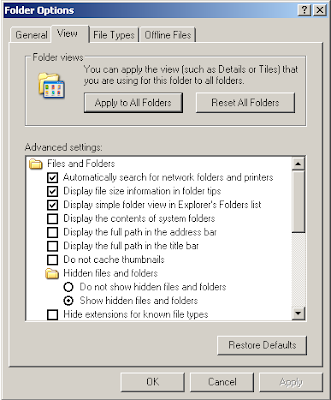
In order to delete these files we must first make the folder that contains them visible. To do this you need to open Windows Explorer - by double-clicking on 'My Computer', holding down the Windows key and pressing E, or whichever your preferred method is - pulling down the 'Tools' menu and selecting 'Folder Options'. Select the 'View' page and make sure that 'Show hidden files and folders is selected'.
Next you will need to open your system drive; which, for most people, will be the 'C: drive.' From there double click on 'Documents and Settings'. This will open the folder that contains all the profiles for all the users on the PC. Open up the folder for your user, if you are not sure what your user-name is open the Start menu which should show your user-name at the top.
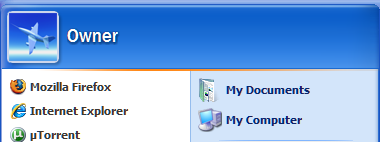
As you can see, my user-name is 'Owner'. If the Start menu doesn't tell you your user-name, you can find it out on the 'Users' page of the Windows Task Manager. There are instructions on how to do this in an earlier post on this blog.
This is the contents of the folder for my user.

As you can see, some of the folders are slightly greyed; this is because they are 'hidden folders'. We must open one of these to access the temporary files folder: double-click on 'Local Settings'. In this folder we see one called 'Temp'. This is the folder we are looking for, so open it up. If the 'Temp' folder is empty you are done. If not, it is time to delete the detritus that is there.
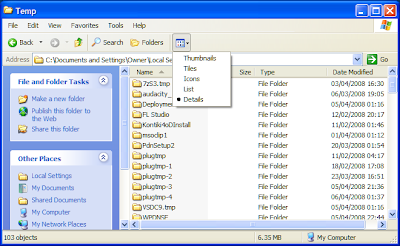
Firstly make sure that you have closed as many programs as possible. Next we need to make sure that the list of files is set to the 'Details' view. To do this pull down the 'View' menu and select 'Details' or use the toolbar button as shown below.
As you can see, I have quite a lot of junk in that folder. The next thing to do is to sort the files and folders into date order. To do this, simply click on 'Date Modified'. By clicking on the headings of columns you can sort the list by that column, the little arrow that appears shows you whether the list is in ascending or descending order. Either will do for what we are trying to do here.
Select all the folders that were created before the current date and press the Delete key. You will be asked whether you want to move them all to the 'Recycle Bin', click 'Yes' and they should all be deleted. If any are cannot be deleted try deleting the remaining folders one at a time. Then try deleting the folders that were created on the current date, but be aware, the chances are that they are still in use and Windows will not let you delete them. If not, that is no problem because, hopefully, they will be deleted by the time the PC shuts down.
You can now repeat the above process for all the files that are there. When you have deleted as many files and folders as possible empty your 'Recycle Bin' and feel the warm glow of a job well done.
In order to delete these files we must first make the folder that contains them visible. To do this you need to open Windows Explorer - by double-clicking on 'My Computer', holding down the Windows key and pressing E, or whichever your preferred method is - pulling down the 'Tools' menu and selecting 'Folder Options'. Select the 'View' page and make sure that 'Show hidden files and folders is selected'.

Next you will need to open your system drive; which, for most people, will be the 'C: drive.' From there double click on 'Documents and Settings'. This will open the folder that contains all the profiles for all the users on the PC. Open up the folder for your user, if you are not sure what your user-name is open the Start menu which should show your user-name at the top.

As you can see, my user-name is 'Owner'. If the Start menu doesn't tell you your user-name, you can find it out on the 'Users' page of the Windows Task Manager. There are instructions on how to do this in an earlier post on this blog.
This is the contents of the folder for my user.

As you can see, some of the folders are slightly greyed; this is because they are 'hidden folders'. We must open one of these to access the temporary files folder: double-click on 'Local Settings'. In this folder we see one called 'Temp'. This is the folder we are looking for, so open it up. If the 'Temp' folder is empty you are done. If not, it is time to delete the detritus that is there.
Firstly make sure that you have closed as many programs as possible. Next we need to make sure that the list of files is set to the 'Details' view. To do this pull down the 'View' menu and select 'Details' or use the toolbar button as shown below.

As you can see, I have quite a lot of junk in that folder. The next thing to do is to sort the files and folders into date order. To do this, simply click on 'Date Modified'. By clicking on the headings of columns you can sort the list by that column, the little arrow that appears shows you whether the list is in ascending or descending order. Either will do for what we are trying to do here.
Select all the folders that were created before the current date and press the Delete key. You will be asked whether you want to move them all to the 'Recycle Bin', click 'Yes' and they should all be deleted. If any are cannot be deleted try deleting the remaining folders one at a time. Then try deleting the folders that were created on the current date, but be aware, the chances are that they are still in use and Windows will not let you delete them. If not, that is no problem because, hopefully, they will be deleted by the time the PC shuts down.
You can now repeat the above process for all the files that are there. When you have deleted as many files and folders as possible empty your 'Recycle Bin' and feel the warm glow of a job well done.


