There are many web sites from which you can download extra fonts for free, such as 1001 Free Fonts, Urban Fonts and many more. The downloaded fonts will be in a zip file, so the first step is to unzip them to your 'Desktop' by simply dragging the font file there. There is no need to copy the text documents that are in the zip file to the 'Desktop'.
Once you have copied all the new fonts you wish to install onto your 'Desktop' you can install them. To do this open up the 'Control Panel'. Your control panel will either be set to the new 'Category views' on XP or Vista or the old 'Classic view'. I will deal with each method of opening the font installation program separately. Vista users can simply right-click on each font file and click on 'Install'; users of other versions of Windows have a few more hoops to jump through.
XP Category View
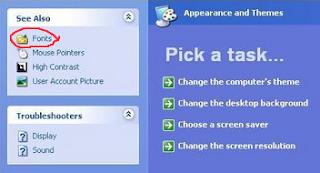
Click on 'Appearance and Themes' to open that category.
Click on 'Fonts' in the 'See also..' list on the left of the window. This will open the 'Fonts' folder.
Classic View
 In the 'Classic View' double click on the 'Fonts' icon to open the 'Fonts' folder.
In spite of the varied ways of opening it, the font installation program has remained unchanged for ages and is the same in all current version of Windows.

To open the font installer pull down the 'File' menu and select 'Install New Font...' to open the 'Add Fonts' tool.
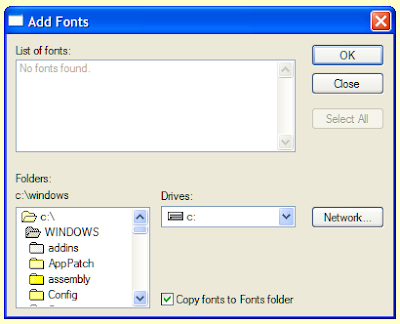
To browse to your 'Desktop' double click on 'c:\', then double-click on 'Documents and Settings', then double click on your user-name (if you don't know it, try all of them), and finally double-click on 'Desktop'. This should then add all the fonts you unzipped to the list.
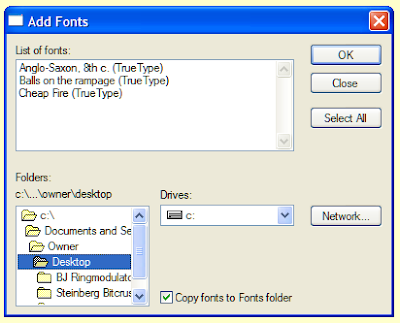
Click on the 'Select All' button and then click on the 'OK' button to install the fonts. They should now be available in all your applications.
It is worth keeping copies of the font files you saved on your desktop somewhere, so that you can reinstall them if you ever have to reinstall Windows on your PC. If you are not concerned about this you can delete the font files from your 'Desktop'.
Addendum
Thanks to vaibhav for pointing out that you can copy the fonts straight to the 'Fonts' folder.
So, the quickest and easiest way to install a new font is to open the 'Fonts' folder as described above, and then drag the font file from the zip file and drop it in the 'Fonts' folder.
Alternatively, unzip a selection of font files to the 'Desktop', then select and copy (Ctrl + C) them all. Open the 'Fonts' folder and pull down the 'Edit' menu and select 'Paste', or right-click the background of the 'Fonts' folder and select 'Paste' from the drop-down menu, or just hold down Ctrl and press V (if there is one way of doing something in Windows then there are probably half a dozen ways of doing it).
Once you have copied all the new fonts you wish to install onto your 'Desktop' you can install them. To do this open up the 'Control Panel'. Your control panel will either be set to the new 'Category views' on XP or Vista or the old 'Classic view'. I will deal with each method of opening the font installation program separately. Vista users can simply right-click on each font file and click on 'Install'; users of other versions of Windows have a few more hoops to jump through.
XP Category View
Click on 'Appearance and Themes' to open that category.
Click on 'Fonts' in the 'See also..' list on the left of the window. This will open the 'Fonts' folder.

Classic View
In spite of the varied ways of opening it, the font installation program has remained unchanged for ages and is the same in all current version of Windows.

To open the font installer pull down the 'File' menu and select 'Install New Font...' to open the 'Add Fonts' tool.

To browse to your 'Desktop' double click on 'c:\', then double-click on 'Documents and Settings', then double click on your user-name (if you don't know it, try all of them), and finally double-click on 'Desktop'. This should then add all the fonts you unzipped to the list.

Click on the 'Select All' button and then click on the 'OK' button to install the fonts. They should now be available in all your applications.
It is worth keeping copies of the font files you saved on your desktop somewhere, so that you can reinstall them if you ever have to reinstall Windows on your PC. If you are not concerned about this you can delete the font files from your 'Desktop'.
Addendum
Thanks to vaibhav for pointing out that you can copy the fonts straight to the 'Fonts' folder.
So, the quickest and easiest way to install a new font is to open the 'Fonts' folder as described above, and then drag the font file from the zip file and drop it in the 'Fonts' folder.
Alternatively, unzip a selection of font files to the 'Desktop', then select and copy (Ctrl + C) them all. Open the 'Fonts' folder and pull down the 'Edit' menu and select 'Paste', or right-click the background of the 'Fonts' folder and select 'Paste' from the drop-down menu, or just hold down Ctrl and press V (if there is one way of doing something in Windows then there are probably half a dozen ways of doing it).

