Tuesday, 22 January 2008

Keyboard shortcut of the week: jump up a level

When you are using Windows Explorer - the file management program that opens when you double-click on 'My Computer' and the like - you can move to the parent folder by clicking the back-space key.

By 'parent folder' I mean the folder that contains the one you are looking at. In the following image we see that the 'parent folder' of Adobe is Program Files.

Another way to achieve the same thing is to press the F4 key followed by the up arrow, and then Return.

Note for Vista users: using the Backspace key in Vista mimics the use in web browsers, that is, it takes you to the previous folder you looked at. To go to the parent directory using Vista, hold down Alt and press the Up cursor.

Monday, 21 January 2008

Five freeware image manipulation tools

The GIMP
This is a fully featured image editor with an interesting name - it stands for GNU Image Manipulation Program (apparently). This is an incredibly powerful application with features that rivals professional software like Photoshop. Whilst this software was originally developed for a Linux environment there is a Windows version available; however, in my experience it does not work well on Windows. Nevertheless many people do use it on Windows machines and enjoy its powerful features although for the novice user it's stark interface may take some getting used to.

Paint.net
Whereas the GIMP's interface may take some getting used to Paint.net's is friendly and intuitive, and while Pain.net is not as feature-rich as the GIMP it is still a powerful image manipulation tool with many of the features found in commercial image editing packages. Because it is quick and easy to use it has become my image editor of choice.

IrfanView32
IrfanView is an image viewer which has few editing features, but it is still a worthy inclusion on this list; although, not even as an image viewer (the one built into most versions of Windows is good enough). The reason I have included it is the batch image process feature, with which you can change the format of many files in one go, say from 'bmp' to 'jpeg', rather than open and save each file separately.


Beneton Movie GIF
This application can be used to create animated GIFs. I used it myself to create the animated advert for a friend's website - the one for younilife that you can see at the top right hand of this page. The software works on the same principle as a flipbook: draw the pictures in an image editor such as paint.net; open them all in Beneton Movie GIF; select the order in which they are to be shown and set the length of time each frame is to be shown for. This may sound a little complicated but it is quite intuitive after a while. The software includes some fancy transition features to create dynamic looking animations.

IcoFX

IcoFX is an icon editor. I used it myself to create the favicon for Bloody Computer! (the yellow exclamation mark that you see next the this webpages' URL in the address bar). This software supports all the various Windows icon formats, including those for Vista.

Saturday, 19 January 2008

MS Word: replace, reformat, rejoice

Here is the scenario, you have copied some text from somewhere and pasted it into Word; however, the text ends up looking something like this.

To see the cause of this problem, press the 'Show/Hide ' button. As shown, the original text has carriage returns - as indicated by the '¶' marks - at the end of the original lines. When this text was pasted into word the lines were no longer the same length, so, the carriage returns were in the wrong place.

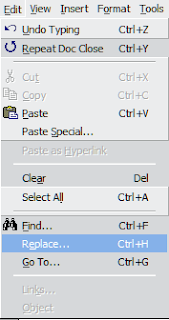
The solution to this problem is to replace the carriage returns with spaces. You can do this manually, or use the replace feature in Word. To open the 'Find and Replace' dialog box, pull down the 'Edit' menu and select 'Replace' - you may have to click the double arrows at the bottom of the menu to display all the entries on the menu - or you could hold down the Ctrl key and press H.

Each special character has its own code associated with it. For the carriage return this is '^p', for Tab it is '^t' and so on (you can see them all by pressing the 'More' button on the 'Find and Replace' dialog box - this will display more options - and press the 'Special' button.

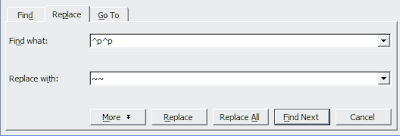
The text we are editing is broken into various paragraphs with an empty line between them. In order to maintain this separation of paragraphs, we need to mark all the places where one return follows another. I usually use two tildes '~' to mark these, because that rarely occurs in a text. Fill in the fields as below and press the 'Replace all' button.


A dialog box will be shown telling you how many replacements have been made. Press OK to close it. The text will then look like this...

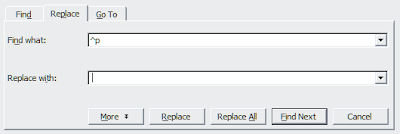
With the separation of paragraphs marked we can now remove all those superfluous returns. Enter '^p' in the Find what: field and a space in the Replace with: field.


Press 'Replace All' again and OK when you are told how many replacements have been made. The text will then look like this...

We need to return the paragraphs to their original form. To do this replace all the occasions of '~~' with two carriage returns, as in the following image. Again, press 'Replace All'.


The text should now look like this. We are very close to what we want, except that there are some superfluous spaces in the quote at the bottom.

To remove these, go to the 'Find and Replace' dialog box again, and enter two spaces in the Find what: field and one space in the Replace with: field. Keep pressing the 'Replace All' button until there are no more examples to replace. The text should now look like this: nicely formatted with all the separate paragraphs maintained.

Friday, 18 January 2008

Guest article: Computer Error Basics

This is the first guest article here at Bloody Computer! It was written by James Ricketts from Instant Registry Fixes. I hope you enjoy it and find it useful. K


Windows errors can occur at any time due to several reasons. Most of the time, these errors leave us helpless and may even cause us to lose important data and spend large amounts of money on expensive computer repairs.

We end up going through a lot of trouble, when in fact, there are some very simple steps that can easily help prevent these problems from happening in the first place. The top two causes of computer errors are malware and registry errors. Let’s take a look at some of the methods to deal with these problems and fix computer errors.

Keep Your Computer Malware Free

To keep your computer free of errors and other problems, it is essential for all PC users to have anti malware tools installed on their PCs. Primarily, there are three tools that are crucial for all PC users—Anti-virus, Anti-spyware, and Anti-spam.

Antivirus tools help you keep your PC free from malicious programs such as Virus, Trojans, worms, and backdoors. Antispyware tools help prevent and remove spyware and adware programs that steal personal information from your computer and then utilize it to display pop-ads on your PC without your consent. Many adware programs may lead you to dubious Websites or download virus infected programs on your system. Anti-spam tools help you prevent the download of unsolicited, junk e-mail to your system. These tools basically plug-in to your e-mail program such as Microsoft Outlook or Outlook Express and weed out spam mails and help you block them.

There are many anti-malware products available in the market today that incorporate all three tools and provide you with a one point solution to all your malware related problems. However, these products are expensive. And, if you don’t want to spend that much you can look over the Web for freeware and shareware tools and download the ones that have good user reviews and are compatible with your operating system. After you have installed these anti-malware tools on your system, you must be sure to do the following:

  • Enable the real-time-protection feature.
  • Update them regularly with the latest definition released by their manufacturers.
  • Run regular full system scans to keep your system free of malicious information.

Maintain an Error Free Registry

Several Windows errors are generated due to registry problems. Before you learn how to cleanup the registry, you must know what the registry is. The registry is basically a hierarchal database that comprises information related to user preferences, hardware and software configuration and system settings. This is the reason why, there is not a single activity that can be performed on your system without accessing the registry. Registry problems occur when it starts getting filled up with unwanted, obsolete, and erroneous information. Some of the reasons why this data creeps into the registry are:

  • Frequent program install and uninstall.
  • Incorrect program uninstall.
  • Faulty programs and device drivers.
  • Malware infections and many more.

This unwanted information causes the registry to grow at an uncontrollable rate and eventually causes registry damage and fragmentation. These registry problems give rise to several computer errors such as runtime errors, dll errors, and driver errors. In severe cases, registry problems may even render your PC unbootable.

Although troublesome, you can easily deal with registry problems with the help of a third-party registry repair tool. There are several tools available on the Internet. You must be sure to look at the features each of them offer, and see what other users have to say about them, in order to download the one that best suits your requirements and is compatible with your operating system.

Some of the tasks you can perform using a registry repair tool are:

  • Automatically scan, detect, and remove unwanted and erroneous information from the registry.
  • Perform customized searches to look for specific problems and repair them—for instance, to perform DLL repair, you can customize the search for DLL-related problems and resolve them.
  • Defrag the registry to reindex its files and reduce its size.
  • Backup the registry and easily restore it if your current registry fails.

Regular system maintenance goes a long way in keeping your PC healthy and error-free. In addition to malware and registry scans, you may also use the Disk Cleanup tool to remove junk from your hard disk and use the Disk Defragmenter to consolidate any fragmented files.

Wednesday, 16 January 2008

Eject that CD or DVD the lazy way

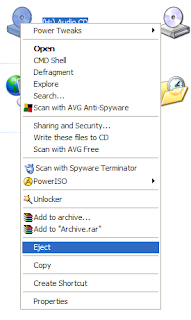
After recently writing about context menus and the 'Applications' key, I remembered that you can eject your CD or DVD drive tray using Windows, rather than having to press that little button, which - for some reason - the drive manufacturers put beneath the tray. So if you have to reach down to your PC, you have to whip your finger out of the way so as not to impede the opening tray. To eject the drive right-click on its icon in My Computer and click on 'Eject'. Obvious really, but, no keyboard shortcut.


You could try the following combination of keyboard shortcuts though:
  • Windows key + M or D (minimise everything)
  • Windows key + E (open My Computer)
  • Down cursor to highlight CD/DVD drive icon
  • Applications key
  • Down cursor to highlight 'Eject'
  • Enter key
But that is hardly a shortcut at all.

Monday, 14 January 2008

Windows Task Manager Explained: Part 2

Continuation from part 1

Networking Tab

The 'Networking' tab provides a visual representation of the amount of data that your network connections are transmitting and receiving over time. Note that the percentages quoted are of the maximum possible capacity under ideal circumstances, and do not take other factors into consideration, such as the amount of Internet bandwidth that is available on your connection.


Users Tab

The final tab may not be available on your version of Windows. It lists all users that that have recently logged on to Windows. You can use this page to force other users disconnect or log-off if you have sufficient access rights. The disconnect option is available if the user is accessing your machine across a network, the log-off option is available if they are locally logged on to your computer.

The 'Users' tab also has an option to send a message to other users. If they are connected to your PC over a network you can message them to warn them if you have to reboot; however, this function may require certain services to be activated on their machine. Alternatively, you can use it to message other users of the same PC, as demonstrated in the following images. This is a more environmentally friendly alternative to sticky paper notes. To use this facility, highlight the user you wish to send a message to and click the - wait for it - 'Send Message...' button.

This was the exciting message I received when I logged back on as Administrator.


Time for bed

The final facility in the Task Manager that I am going to review is the 'Shut Down' menu. Which offers the usual selection of features for logging off, rebooting, and powering down the PC.

Sunday, 13 January 2008

Windows Task Manager Explained: Part 1

Starting the Task Manager

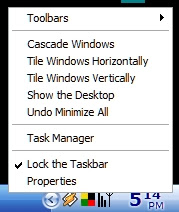
There are a couple of ways to show the Windows Task Manager: hold down the Ctrl and Alt keys and press the Delete key - Task Manager will then open some versions of Windows, in others you will be presented with a small dialog box that has a button you can click to open the Task Manager; alternatively you can right-click on empty space on the Taskbar and select Task Manager from the menu.


Applications Tab

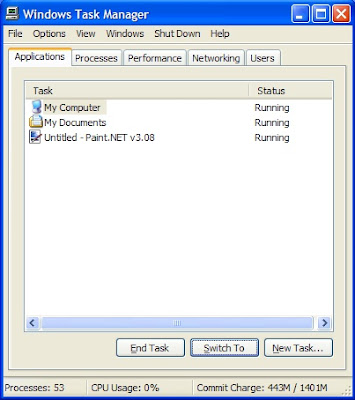
The first page on the Task Manager lists all the applications that are running on the PC. This mimics the list that you see as buttons on the Taskbar. If you highlight an application in the list and click the 'End Task' button that application will then close. This is particularly useful if an application has a status of 'Not Responding' when normal attempts to close it will fail.

The 'New Task' button works in the same way as the 'Run' item in the Start Menu.


Processes Tab

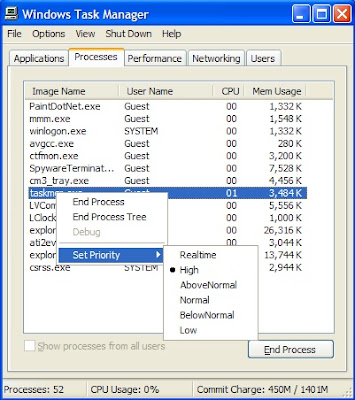
The 'Processes' page lists all the programs that are running on your computer. Note that there are more items listed here than on the 'Applications' tab. This is because the listed items include all the programs that run in the background and are either unavailable on the Taskbar or appear as small icons in the Systray. Using the mouse to right-click on an entry (or using the Application key) will open a context menu. As with the 'Applications' tab you can end a process, but you also have the option of changing the priority that Windows gives a process, which means you can effectively give the process more or less of Windows' resources making it run faster or slower. Beware of using this function as you can slow other processes down, including Windows' own essential services.

Performance Tab

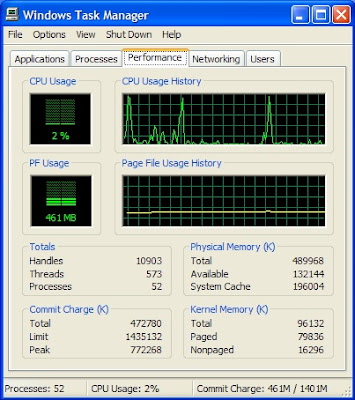
The 'Performance' tab provides a visual representation of how much 'work' your CPU is doing. The CPU - also known as the processor - is the engine of the computer carrying out all the mathematical tasks that enable the programs to run.

This tab also displays the Page File usage. The Page File - sometimes known as the Swap File - is a file on the hard drive which Windows uses as an extra memory store, because running many processes often requires more memory storage than is physically available on the PC. Windows shifts information back and forth between the physical memory - known as RAM - and the Page File.


The remaining tabs and features of the Task Manager will be explored in the following post.