Showing posts with label Word Processing. Show all posts

Saturday 22 September 2012

Keyboard shortcut of the week: Sub- and Superscript

Occasionally we have to make use of subscripts or superscripts in our documents. The most common use of these is with dates, as in 20th. There the 'th' is a superscript; that is, smaller text that is raised. Subscripts are most often used in technical language such as if we refer to water as H2O. There the subscript is the '2'; smaller text that is lowered.

To switch to subscript mode or to change the selected text to a subscript, hold down the Control key and press the = key. This same combination will also set selected subscript text back to normal and switch out of subscript mode, as with the keyboard shortcuts for bold or italic mode.

To switch to superscript mode or to change the selected text to a superscript, hold down the Control key and the Shift key, and then press the + key. As with subscripts the same combination switches back to normal text to if presses again.

This tip applies to Microsoft Word and PowerPoint, but unfortunately not to Excel.

Thursday 1 September 2011

LibreOffice 3.4

I have featured OpenOffice.org on this blog a few times in the past. It is a free office suite featuring a word processor, a spreadsheet program, and a presentation maker. Until recently the software was produced by Oracle Corporation, but fears that they would cease to support the project or stop it being open-source resulted in many of the programmers setting up their own project: LibreOffice.


LibreOffice is a fork of OpenOffice.org (now produced by Apache Software Foundation), so users of the latter will make an easy transition to the former. The application names have been carried over: Writer is the word processor; Calc for spreadsheets; Impress for presentations; and so on. Furthermore, the look and feel of the packages has changed little.


Version 3.4 of LibreOffice offers many improvements on version 3.3. There is much better memory management and less of a reliance on Java. Calc is more compatible with Microsoft Excel. But the most improved application is Impress, which flies along compared to the old version.


The continuing development of LibreOffice seems assured, whereas OpenOffice,org appears to be in limbo. For that reason LibreOffice is now my office suite of choice and I would recommend users of OpenOffice.org switch over to its latest version.

Friday 1 April 2011

How to compress images in Word and Powerpoint

Inserted images in Word and Powerpoint may appear small, but they are actually stored as their original size unless compressed. This can cause printing to take a long time and needlessly increase file sizes. Thankfully there is a way to compress images in both these applications.

Office 2000, XP and 2003

Open the view menu and select 'Pictures' from the 'Toolbars' sub-menu. The picture toolbar, as shown below, should appear.

Click on the 'Compress pictures' icon (highlighted in orange on the above picture).

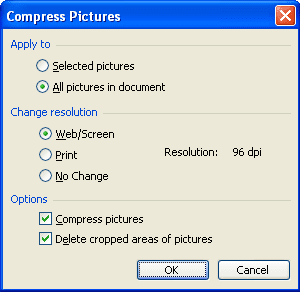
This opens the following window.


Select 'Web/Screen' for the highest level of compression, or 'Print' for a lower level. Make sure that 'Apply to' is set to 'All pictures in document', and click 'OK'.

You may then receive the following warning. If you do, click the 'Apply' button.


Office 2007 and 2010


Click on any image to enable 'Picture Tools', and click the 'Format' tab shown below.


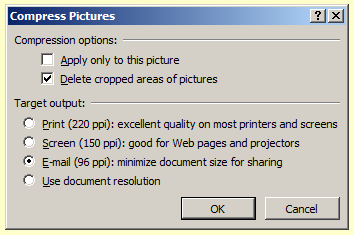
Click the 'Compress Pictures' button (highlighted in orange on the above picture), to open the following window.

Select whichever level of compression best suits your purposes. Make sure that 'Apply only to this picture' is not selected, and click the 'OK' button.

Wednesday 16 March 2011

How to print two pages per sheet

Cutting down on the amount of paper used in printing not only saves money, but is also more environmentally friendly. Some applications offer the option of printing multiple pages per sheet of paper. In this post I will show you how to print two pages per sheet in MS Word and Adobe Acrobat Reader.

MS Word
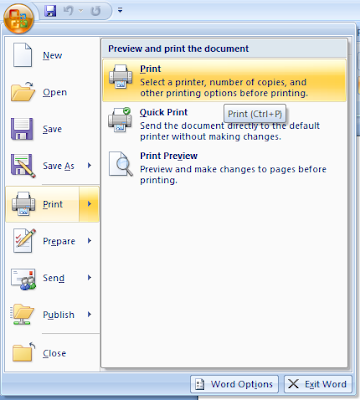
Open the print dialogue from the 'File' menu in older versions of Word, or by clicking the Office Button in newer versions (as shown below).


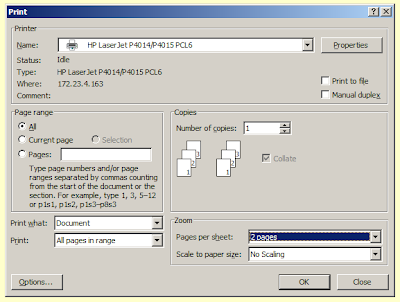
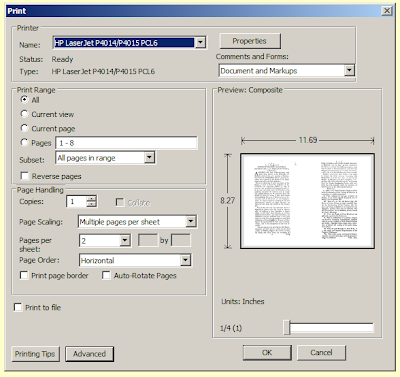
Simply set 'Pages per sheet' to '2 pages' and click 'OK'.


Adobe Acrobat
Open the print dialogue from the 'File' menu.
Change 'Page Scaling' to 'Multiple pages per sheet' and 'Pages per sheet' to '2'.


OpenOffice
I found no easy way to print two pages per sheet in OpenOffice, but you can save the file as a pdf using the 'Export as PDF' tool in the 'File' menu and then open it in Adobe Acrobat and follow the above instructions.

Thursday 9 September 2010

Linux commands for OpenOffice applications

In order to create a launcher for a particular OpenOffice application, or if you wish to run one from a terminal in Linux, you will need to know which command opens each application. Unlike Microsoft Office, for example, there is one command to run OpenOffice to which you can add a parameter to run a particular application.

Command to run the Writer word processor: openoffice.org -writer

Command to run the Calc spreadsheet application: openoffice.org -calc

Command to run the Impress presentation application: openoffice.org -impress

Command to run the Base database application: openoffice.org -base

Command to run the Draw vector graphics editor: openoffice.org -draw

Friday 28 May 2010

How to copy charts into a word processor

When copying charts into a word processor, whether in Microsoft Office from Excel to Word or in openoffice.org from Calc to Writer, the software embeds a special object that links back to the original spreadsheet. If you then change the details in the Excel spreadsheet the chart in the Word document will change accordingly. In many cases this is advantageous; however, it can cause problems if the Word document cannot 'see' the Excel file, for example, if you email the Word file to someone without the Excel file. It is generally better to paste the chart as an image in the first place using the 'Paste special' facility.

I will start by explaining how to do this in Microsoft Office:

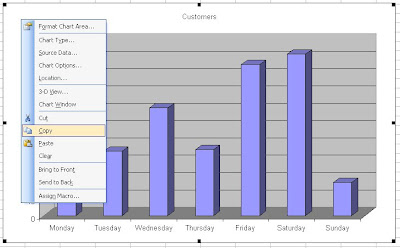
Once you have created your chart in Excel you select it and copy it, as shown here.


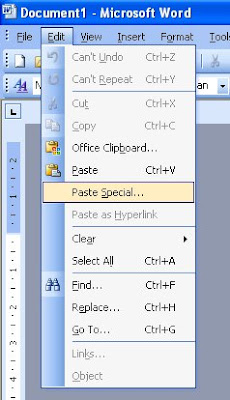
In older versions of Word you pull down the 'Edit' menu and select 'Paste Special'. You may have to wait a moment for all the menu items to be revealed.


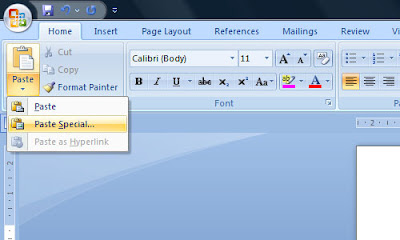
In the latest versions of Word, 'Paste special' is in a menu underneath the 'Paste' button.


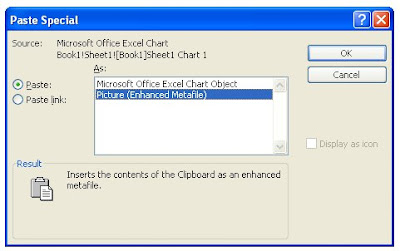
A box will open, from which you select 'Picture (Enhanced Metafile)', and click OK.

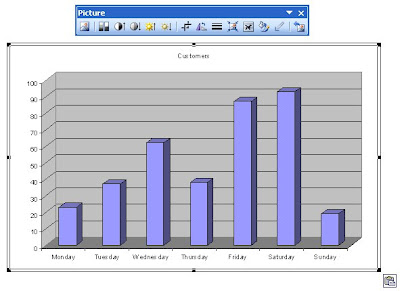
This will then insert the chart as a picture, which you can manipulate like any other imported image.
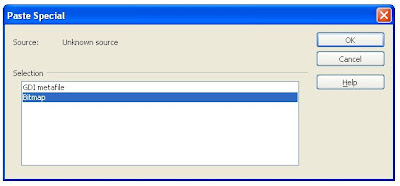
In openoffice.org, the procedure is pretty much the same as above, with 'Paste special' is in the 'Edit' menu, or alternatively you can use a keyboard shortcut: Ctrl + Shift + V. The major difference from above is that the following box will open when you select 'Paste special'. Simply select 'Bitmap' and click OK to paste the chart as a picture.

Wednesday 24 February 2010

OpenOffice Keyboard Shortcuts

Writer, the word processor in OpenOffice.org, uses many of the same keyboard shortcuts as MS Word. The shortcuts for selecting, editing and formatting text follow established standards. Whereas Writer has a keyboard shortcut for 'Paste special' (Ctrl + Shift + V) - something missing in Word - it does not have one for changing the case of selected text. It is possible to set up new shortcuts in Writer, and I will show you how to set up one to make the selected text upper-case and another to make it lower-case.

In Writer pull down the 'Tools' menu and click 'Customise'.

Select the 'Keyboard' tab, as shown below.

You can see all the default keyboard shortcuts, and some spare key combinations.

I have chosen Ctrl + Shift + U to make selected text upper case, and Ctrl + Shift + L to make it lower case.


Find Ctrl + Shift + U in the 'Shortcut keys' list. Select 'Format' from the 'Category' list, and then 'Uppercase' from the 'Function' list. Click the 'Modify' button to make the change.


Repeat the process selecting Ctrl + Shift + L, the 'Format' category, and the 'Lowercase' function, not forgetting to click the 'Modify' and then the 'OK' buttons when you are done.

Friday 11 December 2009

Linux applications: Part 1 - Productivity

As I mentioned in a recent post, I have recently switched to a Linux distribution as my operating system of choice. Many other users may be put off from making a similar switch because they are concerned that they may not be able to use the applications that they know from the Windows environment. While some applications are not available on Linux, there are a number of alternatives that offer all the most important features and have the benefit of not costing a penny.

Office Software

OpenOffice.org from Sun Microsystems is a decent replacement for Microsoft Office. It includes a word processor called Writer, a spreadsheet package called Calc, presentation authoring software called Impress, a database management system called Base, and a vector graphics program called Draw, which doubles up as a simple desk top publishing package. Using OpenOffice.org you can open and save files in Word, Excel and Powerpoint file formats and even save them in pdf format too. So far I have had no problems transferring files between OpenOffice.org and Microsoft Office, although you may be advised to install the default Microsoft fonts. For Ubuntu users the MS font package is called msttcorefonts. OpenOffice.org is not only available for Linux, but also for Windows and Mac OS.


PDF Reader
While Adobe Acrobat is available for Linux, it is as bloated as its Windows equivalent. Evince is a good lightweight alternative, with the added benefit of support for djvu files. If you use KDE as your windows manager then you may also want to consider KPDF.


Graphics software
As with OpenOffice.org, GIMP is available for Linux, Windows and Mac OS; although I have had problems using it on Windows in the past. It is a feature rich graphics manipulation program that supports all commonly used image formats.


In the next part I will look at for entertainment software available for Linux.

Thursday 9 July 2009

Customising the Quick Access Toolbar

In a recent post about adding buttons to the toolbars in Microsoft Office applications I pointed out that there is no way to add buttons to the new 'ribbon' that has replaced the old toolbars. Nevertheless, it has come to my attention that there is still one customisable toolbar in the latest versions of Word, Excel and Powerpoint. This is called the 'Quick Access Toolbar'. If you wish to add extra buttons to this toolbar you can do so by following the instructions on the 'Microsoft Office Online' pages. [http://office.microsoft.com/en-us/word/HA012341051033.aspx]

I do not have a copy of MS Office 2007 myself, so I do not know whether you can add a button for the useful 'Past Special' function. If you have a copy of any of the Office 2007 applications, please let me know how you have got on when adding buttons to this toolbar.

Tuesday 19 May 2009

Putting new buttons on toolbars in MS Office (before the 2007 version)

A while ago I published an article that suggested that rather than printing directly from web browsers, such as Internet Explorer, it is better to copy the information that you want into a word processor and print it from there. In that article I mentioned the use of the 'Paste Special' in Word, which enables you to remove formatting from the information that you paste. In this article I will explain how to put a button for 'Paste Special' onto the toolbar in Microsoft Word 2003 and other earlier versions. This technique can also be used to add any of the other available buttons onto any toolbar.

Open up Word and right-click on one of the toolbars, which are at the top of the screen below the menu and look something like this:


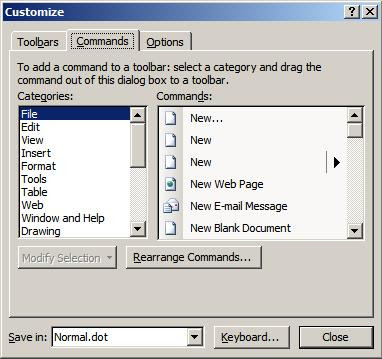
From the menu, select 'Customize...', which will open a dialog box. Click on the 'Commands' tab.


Select 'Edit' from the left-hand menu, because the 'Paste Special' tool is listed in the 'Edit' menu. Scroll down through the list on the right-hand until you see 'Paste Special' then left-click on it and hold the mouse button down. The mouse pointer should change to an arrow pointing at a rectangle with a square to the bottom right, which will have an X in it initially.

Move the pointer up to the toolbars and release the mouse button when it is in a suitable position: next to the normal paste button for example. You will notice that the mouse pointer changed appearance again when you hovered over the toolbar, with the X being replaced with a + to let you know that the new button can be placed there.

Your toolbar should now look something like this:

If you wish to remove a button from the toolbar, follow the instructions above for opening the 'Customize' dialog, but rather than drag from the dialog box to the toolbar, click on the button you wish to remove from the toolbar and drag it into the dialog box.

This process also works in the other Microsoft Office applications such as Excel and PowerPoint. With Office 2007, Microsoft have replaced the old tried-and-tested menu and toolbar arrangement with something called 'ribbons' (as pictured below) and there is no way to customise these in the same way as detailed above.

This is an edited version of a post that first appeared on Bloody Computer! on 19th November 2007.

Friday 23 January 2009

Faster word processing revisited

Do you wish to be able to use your word processor more efficiently? Would you like to be able to edit a piece of text without having to reach for the mouse every few seconds? If your answer is 'yes' then this selection of time-saving keyboard shortcuts are for you. They should work in any text editor on Windows (and possibly on other operating systems too), whether you are using a word processor or a comments box on a web page.

I have included a text box as part of this article so you can play around with the various key combinations. For those interested, the text in the box is the opening paragraph of Candide by Voltaire.

We will start with quick navigation links.
  • The Home key will move the cursor to the beginning of the line (on most keyboards this key is in a collection of 6 keys located above the cursor keys).
  • The End key will, unsurprisingly, move the cursor to the end of the line.
  • If you hold down Ctrl and press Home, the cursor will move to the beginning of the document. Ctrl and End will take the cursor to the end of the document.
  • The Page Up and Page Down keys do 'exactly what it says on the tin'; they move the cursor one page up or one page down.

You probably already use the cursor keys (the ones with arrows on) to navigate around your compositions, moving one character at a time. If you hold Ctrl and press the left or right cursor keys you can jump one word at a time, left or right.

You should now be able to whiz around your documents; but what about keyboard shortcuts for selecting bits of the text? To select, simply hold down the Shift key as well as the key combinations I have already mentioned.

  • Holding down Shift and pressing a cursor key will select one character to the left or right, dependent on which cursor key you press.
  • Hold Shift and press Home to select the text from the cursor position to the beginning of a line. Shift and End selects the text from cursor to end of line. Thus, a quick way to select a line of text is to press Home, hold down Shift and press End.
  • Holding down Shift and Ctrl together and pressing Home will select all the text between the cursor position and the start of the document. Holding down Shift and Ctrl while pressing End selects all the text between cursor and end of document.
  • To select the whole document you could hold down Ctrl and press Home to take you to the top; then Shift, Ctrl and End to select to end; however, it is much easier to use the keyboard combination for selecting the whole of a text: Ctrl and A.
  • Holding down Shift and Ctrl and pressing a cursor key will select one word left or right, dependent on which cursor key you press.

So, you can whiz through your document selecting chunks of text as you go. The last selection of key combinations in this article enable you to do stuff to the text.

  • Hold down Ctrl and press C to copy the selected text.
  • Hold down Ctrl and press X to cut the selected text - that is to copy it and delete it.
  • Hold down Ctrl and press V to paste the copied text where the cursor is located.

Whereas, it is easy to remember the key combination for copy (Ctrl+C) the combinations for cut and paste are not so intuitive. When I first started using these particular keyboard shortcuts I remembered the cut combination because the X looks like a pair of scissors, and the V looks a little like an upturned glue pot (a little imagination is required I know).

Play around with all these key combinations in this text box.


Some text boxes allow you to use 'rich text'; that is, text that has extra formatting options such as bold, italic or underline.

  • Hold down Ctrl and press B to make the selected text bold.
  • Hold down Ctrl and press I to make the selected text italic.
  • Ctrl and U will underline the selected text.

Thankfully all three of these are intuitive, so no need for imaginative mnemonics to remember them.

To further increase your productivity while using a word processor you can use your keyboard to access the application's menus too as detailed in this tutorial.

This is an edited version of a post that I originally posted on September 5, 2007.

Wednesday 20 August 2008

Keyboard shortcut of the week: a view of Word

There are a number of ways in which you can view a document in MS Word. You can switch between these different layouts by selecting them from the 'View' menu, or you can use keyboard shortcuts to quickly switch between them.

My preferred choice is 'Print layout', which can be selected by holding down the Ctrl and Alt keys and pressing P.

To select the 'Normal layout' hold down the Ctrl and Alt keys and press N.

To see the 'Overview layout' hold down Ctrl and Alt and press O.

Or if you prefer to see more than one page at a time, go to the 'Reading view' by holding down the Alt key and pressing R.

Finally, although it is not strictly a layout, you can switch the 'Print preview' on and off by holding down Ctrl and Alt keys and pressing I.

Monday 12 May 2008

Multiple Series of Page Numbers

Sometimes a MS Word document requires separate numbering systems for different sections. The introduction may have to be numbered with Roman numerals (i, ii, iii, etc), while the main body of the text may require normal Arabic numerals (1, 2 3, etc). There is a way of achieving this in Word without having to save the different sections as different files.

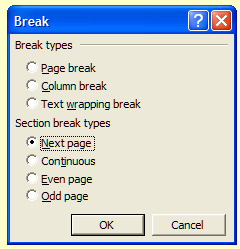
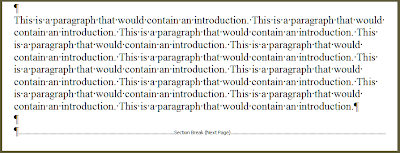
To start, you have to let Word know that the text is split into different sections. To do this, move the cursor to the end of the first section. To mark the end of that section pull down the 'Insert' menu and click on 'Break...' This will open a dialogue box offering a variety of breaks that you can insert. Select 'Next page' from the 'Section break types' list. Click 'OK' to close the dialogue box.

This will move the cursor onto the next page. To see the 'Section break' click on the 'Show/hide paragraph' toolbar button (pictured left). If you wish to add any text to the first section it must be put before this section break.


You can now add the page numbering. To do this we need to access the header or the footer (the areas above or below the text where the page numbers will go). In this tutorial the page numbering will be put in the footer. Pull down the 'View' menu and select 'Header and Footer'. Notice how the text turns grey, how two boxes appear on each page, and the appearance of a 'Header and Footer' toolbar. Click inside the footer for Section 1 and then on the 'Insert Page Number' button on the toolbar (shown right).

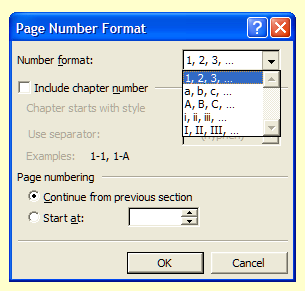
You will see that page numbers are now shown in the footer. You can align page numbers as if they were normal text. To change the format to Roman numerals click the 'Format Page Number' button (shown left). A dialogue box will open, pull down the 'Number format' list, select 'i, ii, iii, ...' and click on 'OK'.

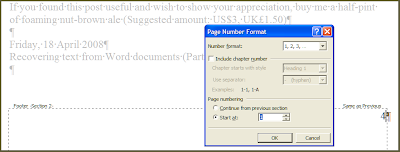
You now need to reformat the numbers in the second section. Move down to the section 2 footer and click inside it (you will notice that the page numbers are still in Arabic numerals in this footer). Click on the 'Number format' button and in the 'Page numbering' section select 'Start at' and make sure the number is '1'. Click 'OK'.


To finish click the 'Close' button on the 'Header and Footer' toolbar.

Tuesday 22 April 2008

Using AutoText in Word

If there are things that you find yourself typing regularly, there is a way of increasing your productivity. By using Word's AutoText feature you only have to start typing a few letters of your name or postal address before it offers an option to fill the rest of the text for you. Word comes with a number of entries already set up. If you start to type the word 'Cordially', you should notice a little box appear like the one pictured below. As it says, just press Enter and Word will insert the rest of the text.

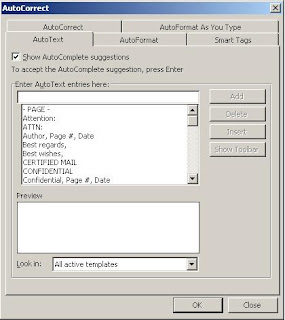
If this does not appear, you probably have AutoComplete switched off. To switch this on, and to see a list of all the existing AutoText entries, pull down the 'Insert' menu and from the 'AutoText' sub-menu click on 'AutoText...', which will open the following dialog box.


Make sure that 'Show AutoComplete selections' is ticked. You can also create a new AutoText entry with this dialog by typing the text where indicated and clicking the 'Add' button; however, there is an easier way to do it.

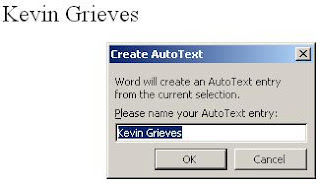
Click on 'OK' to close the dialog box and in your current word document type your name. Select the text and either pull down the 'Insert' menu, then the 'AutoText' sub-menu, and click on 'Add...' or simply hold down the Alt key and press F3. You will then be asked to give the new AutoText entry a name.


From now on when you start to type your name you will be offered the option to insert it as with 'Cordially'. The advantage of entering new AutoText this way is that you can insert text that spans several lines like your postal address. All you need to do is type it in select it and press Alt and F3, as before. You can even add pictures to AutoText by selecting them along with some text or on their own and following the above instructions.

Friday 18 April 2008

Recovering text from Word documents (Part 2)

In the previous part of this article I looked at using the built in text recovery features in MS Word. But, what can be done if this doesn't work? One way to try to recover text from a corrupted file is to open it in Notepad.

To open Notepad click on the Start button, go to 'App Programs', then 'Accessories' and click on its icon. You can then drag and drop the corrupt file into Notepad.

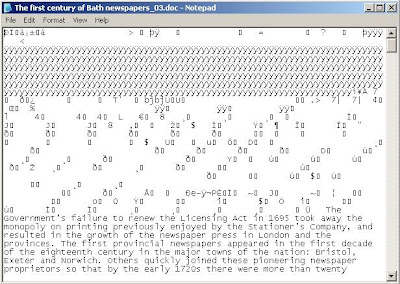
You will then see something that looks like this.


As you can see Notepad is showing some garbage as well as the text of the Word document. The garbage is an attempt by Notepad to display binary (non-textual) information such as images and the like.

Switch on word wrapping, making Notepad remove the scroll bar from the bottom and spread long pieces of text over more than one line. To do this pull down the 'Format' menu and click on 'Word Wrap' if it is not already ticked. This will make the file easier to search through for the text you wish to recover.

You can now either just browse through the file copying and pasting the text you want into a new Word document, or you can use the 'Find...' facility in Notepad to locate the lost text (it is in the 'Edit' menu). Searching for frequently used words like 'the' or 'is' should enable you to quickly find the actual text among all the garbage.

For details on how to quickly select, copy and paste text, see this post.

Wednesday 16 April 2008

Recovering text from Word documents (Part 1)

If Microsoft Word runs into a problem with a file it usually offers a recover option when you open the program the next time. But sometimes this option is not given to you, and you have to try to recover text from a corrupted file manually.

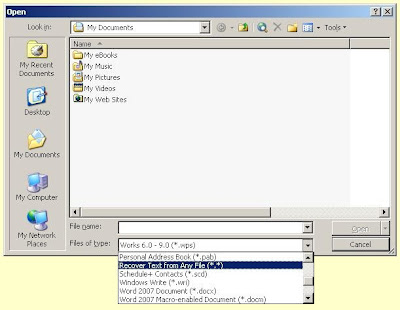
To do this pull down the 'File' menu in Word and select 'Open...' to see the appropriate dialog box. From the 'Files of type' drop-down list select 'Recover Text from Any File'. Then browse to the file you wish to try to recover text, select it, and click the 'Open' button. With any luck Word will extract the text from that file. This process may work with files of types that Word does not support too.

In the second part of the article I will look at what to do if this method fails.

Monday 31 March 2008

Keyboard shortcut of the week: The Case of MS Word

When using a word processor it is quite common to forget that that the CapsLock key has been left on, or you might decide that a piece of text looks better in capital letters (also known as upper case: small letters are known as lower case).

Thankfully MS Word has a keyboard shortcut that lets you cycle between different cases and formats. All you need to do is highlight a piece of text, hold down the Shift key and press F3.

Each time you press F3 the case of the letters will change (don't release the Shift key!). So, 'testing' will be replaced with 'Testing' on the first press, and 'TESTING' if you press it a second time. Press F3 again and the text will return to 'testing'.

If you type 'tESTING' by mistake, you can change it to 'testing', then 'Testing', and 'TESTING'; however, it will not return to 'tESTING', probably because it is highly unlikely you'd ever want text to be in that format.

[Addendum]

As one commentator has pointed out, a particular word does not need to be highlighted to have its case changed by this method, all you need to do is have the cursor somewhere within the word. If you wish to change the case of several words then you have to highlight them all. Thanks to A. for this clarification.

Friday 29 February 2008

More spelling and grammar information from Word

I doubt many people do not make use the spellchecking facility in MS Word. Most people probably run a grammar check too. Nevertheless, few people will use Word's readability statistics report.

To switch this report on, open the 'Tools' menu in Word and click on 'Options', select the 'Spelling & Grammar' tab, tick the 'Show Readability Statistics' box, and click 'OK'.


Now, when you click on the 'Spelling and Grammar' button (shown left), Word will go through any errors it finds in the selected text, or the whole text if none is selected, and then it will show you the 'Readability Statistics' report.


This report is particularly useful to anyone who wishes to make their writing more legible. The report not only contains general information about the number of words, characters and sentences etc, but also the average number of sentences per paragraph, words per sentence and the like.

The bottom section includes three very useful measures. The first gives a percentage of the number of passive sentences in the selected text. As you may know, the active voice makes a text more readable, so it is best to avoid the passive voice when possible. There is a good tutorial about the difference between the voices here.

The second and third measures, the Flesch reading ease and the Flesch-Kincaid grade level, show how difficult a text is to comprehend according to mathematical equations. More details on these equations and an explanation of the scales are available here.

Saturday 19 January 2008

MS Word: replace, reformat, rejoice

Here is the scenario, you have copied some text from somewhere and pasted it into Word; however, the text ends up looking something like this.

To see the cause of this problem, press the 'Show/Hide ' button. As shown, the original text has carriage returns - as indicated by the '¶' marks - at the end of the original lines. When this text was pasted into word the lines were no longer the same length, so, the carriage returns were in the wrong place.

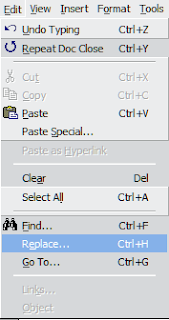
The solution to this problem is to replace the carriage returns with spaces. You can do this manually, or use the replace feature in Word. To open the 'Find and Replace' dialog box, pull down the 'Edit' menu and select 'Replace' - you may have to click the double arrows at the bottom of the menu to display all the entries on the menu - or you could hold down the Ctrl key and press H.

Each special character has its own code associated with it. For the carriage return this is '^p', for Tab it is '^t' and so on (you can see them all by pressing the 'More' button on the 'Find and Replace' dialog box - this will display more options - and press the 'Special' button.

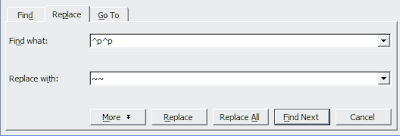
The text we are editing is broken into various paragraphs with an empty line between them. In order to maintain this separation of paragraphs, we need to mark all the places where one return follows another. I usually use two tildes '~' to mark these, because that rarely occurs in a text. Fill in the fields as below and press the 'Replace all' button.

A dialog box will be shown telling you how many replacements have been made. Press OK to close it. The text will then look like this...

With the separation of paragraphs marked we can now remove all those superfluous returns. Enter '^p' in the Find what: field and a space in the Replace with: field.
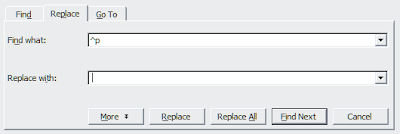

Press 'Replace All' again and OK when you are told how many replacements have been made. The text will then look like this...
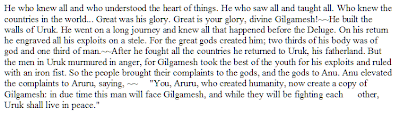
We need to return the paragraphs to their original form. To do this replace all the occasions of '~~' with two carriage returns, as in the following image. Again, press 'Replace All'.


The text should now look like this. We are very close to what we want, except that there are some superfluous spaces in the quote at the bottom.

To remove these, go to the 'Find and Replace' dialog box again, and enter two spaces in the Find what: field and one space in the Replace with: field. Keep pressing the 'Replace All' button until there are no more examples to replace. The text should now look like this: nicely formatted with all the separate paragraphs maintained.