Showing posts with label Windows Explained. Show all posts

Friday 3 December 2010

How to start Windows in safe mode

Safe mode is very useful if you think you may have an infection on your computer, or if there is some other problem with Windows. Safe mode is a way to start Windows with the minimum of applications and facilities running. Consequently, viruses and the like are not invited to the 'safe mode' party.

To enter safe mode on Windows you need to press the F8 key when the system is booting up. You may have to wait a moment or two for the BIOS to finish its work. That is, you should wait for the initial 'splash screen' and system information to disappear. If you miss your opportunity, don't worry, just restart the machine and have another go.

After pressing F8 you will be presented with a menu of 'Advanced Boot Mode' options. For the purposes of this post we are only interested in the first two of these: 'Safe Mode' and 'Safe Mode with Networking'. You should have up-to-date anti-virus and other security software installed on your machine. If you do not, you can use 'Safe Mode with Networking' to start up Windows, download, install and run them. However, it is usually best to start the machine using the basic 'Safe Mode' option.

When starting in safe mode you will see a stream of file-names and services being started. If there is a problem with Windows you may see an error message at this stage. If so, make a note of the error message and type it into Google (other search engines are available) on another computer in order to learn more about the problem.

If all else fails and you still can't use Windows normally, you can use safe mode to copy your important files onto a memory stick or some other device before reinstalling Windows.

Sunday 16 November 2008

Jargon Busting: Anatomy of a window (Part 2)

A number of weeks ago I posted an article naming the various elements that you will find in in Windows programs. This is the second part of that series. Unfortunately, whereas in the last post the displayed elements were interactive, in this post they will only be images.

Scroll Bar
A control for shifting the contents of a window left and right on horizontal scroll bars or up and down on vertical ones.


Slider
This control can be used to adjust a value within a limited range. Sometimes the value chosen with the slider will be displayed. On some sliders there will be only a few values that can be chosen, as with the screen resolution selector.


Spinner
The spinner is a combination of a numeric input box and two small buttons with which you can increase and decrease its value.

Tree View
Tree views appear in a variety of forms, but share the same basic characteristics: items containing sub-items containing sub-items and so on. On some tree views each item will have an associated tick boxes. Click on the + symbol next to an item to see the sub-items it contains. The symbol will then change to a -, which you can click to hide the sub-items.

Tuesday 7 October 2008

Jargon Busting: Anatomy of a window (Part 1)

All the various controls on a Windows program have names that are not always intuitive. In this post I will identify the most common controls and list the various names that they are known by. I will not bother with buttons or menus as everyone should know what they are. All the controls on this post are interactive, rather than just being images.


Text box, Text field, Text Entry, Input Box
A control into which you can type text. It can be a single line as above, or multiple lines as below.

Radio button, Option button
This control enables you to select one of a number of choices.


Male
Female
Check box, Tick box
These either appear singly offering an on/off or yes/no choice, or they offer a chance to select a multitude of options.


What do you own?
Desktop PC:
Laptop
PDA
List box
This control enables you to select one or more items from a list. To select more than one item hold down the Ctrl key while clicking.


Drop-down list
This element allows you to select an item from a list

In the next post in this series I will look at other program controls, such as sliders, spinners, trees and grids.

Monday 25 February 2008

Windows Folder Options Explained (Part 4)

Continued from part 3...

File Types
This tab contains a list of all the file types that Windows knows about and which programs are configured to open them if you double-click on their icons.


As the image shows, if a .doc document is double-clicked on it will open in MS Word. You can change the program that is associated with a file type by selecting its entry and pressing the 'Change...' button.

Occasionally you might want to delete file types from the list, if you do not use files of a certain type any more. Highlight the entry for the file type and press the 'Delete' button. This will reduce the size of the Registry (a file that contains most of the settings for Windows and other applications), but not by enough to have a significant impact on performance. So, the chances are that you will probably want to leave this list alone.

There is an option to create a new file type for the list, using the 'New' button, but frankly, you are better off just double clicking on a file of the new type and selecting a program to associate it with in the normal way.

Finally there is an 'Advanced' button, which is used to change the way that Windows creates, opens, and prints files of the selected type. It would be best to leave these settings alone unless you know what you are doing, and an explanation of these settings is beyond the scope of this series of articles.

Some versions of Windows will have a fourth tab in the Folder Options dialog box, called 'Offline Files'. This will not be covered within this series of articles as this would require me dealing with the larger issue of folder synchronisation. Something that I may return to in the future.

Saturday 23 February 2008

Windows Folder Options Explained (Part 3)

Continued from part 2...

View Settings continued


Hide protected operating system files (Recommended)
This option is selected by default, to protect users from themselves, as is explained in the warning message that appears if you try to switch it off.


If you click 'Yes' on this dialog box you will be able to see these special system files. The image below shows various system files that are required by Windows to run, such as 'pagefile' which is the swap file which Windows users to manage memory. As the setting suggests, most users will want to leave this option selected.


Launch folder windows in a separate process
This setting, if selected, changes the way that Windows runs different instances of Explorer by running them in separate processes, so if one crashes the others should continue running. You may want to select this but according to user experience it seems to make little difference.


Managing pairs of Web pages and folders

This setting is made available when MS Office XP or 2003 is installed. It effects the way that web pages are saved by Internet Explorer: the default option - 'Show both parts and manage them individually' - saves the web page along with all the files it needs to operate in a folder and these can be manipulated like any other files; however, the other options 'Show and manage the pair as a single file' and 'Show both parts and manage as a single file' link the file and folder in such a way that if one is moved or deleted the other will be treated the same. The last of these options hides the folder which contains the associated files. This is a rather confusing option and is probably best left well alone.


Remember each folder's view settings
This setting is pretty self explanatory. If selected it will mean that each folder will retain whichever display options were applied the last time you accessed it in Explorer.


Restore previous folder windows at logon
If selected, this option will mean that Windows will open all the Explorer windows that you had open when you shut down or logged off your computer previously. Handy if you have to reboot a lot.


Show Control Panel in My Computer
Another self explanatory option. If selected the 'Control Panel' icon will be visible when you view 'My Computer' in Explorer.


Show encrypted or compressed NTFS files in color
NTFS is one of the file systems available in the various versions of Windows and is more feature-rich than the more common file system: FAT32. It includes the facility to compress files (like in zip files) in order to save hard drive space and the ability for the user to encrypt files so that other users will only see gibberish if they open them. If this option is selected the details about compressed files will be blue and those for encrypted files will be green.


Show pop-up description for folders and desktop items
If this option is turned off then the yellow pop-up descriptions that appear when the mouse pointer hovers over a file or folder, as shown below, will no longer appear.


Use simple file sharing (Recommended)
If you wish to have more control over the way that you share files and folders with other users on your network you can switch this option off. For the vast majority of users is inadvisable to change this option. If you have the need for different users to able to access different files you can use this option.

The last part of this series will explain the File Types tab.

Friday 22 February 2008

Windows Folder Options Explained (Part 2)

Continued from part 1....

View Settings
The 'View' tab has two sections. In the first section, 'Folder Views' you can either set Explorer to show all folders according to the current settings using the 'Apply to All Folders' button; or, by clicking the 'Reset All Folders' button, Explorer can be set to display folders as they were when Windows was first installed - this excludes any changes made to the toolbars.


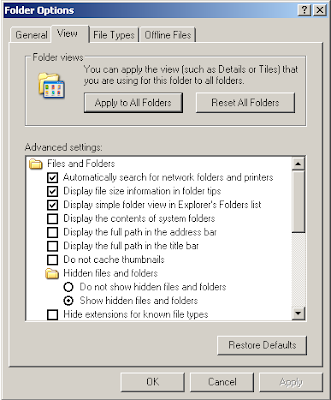
The second section has a number of 'Advanced settings' to change the look and the behaviour of Explorer.


Automatically search for network folders and printer
If this setting is selected Explorer will hunt round the local network for any shared folders or printers. The effects of this setting will be negligible for home users or anyone who is not on a large local area network within a company or other organisation.


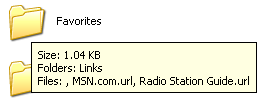
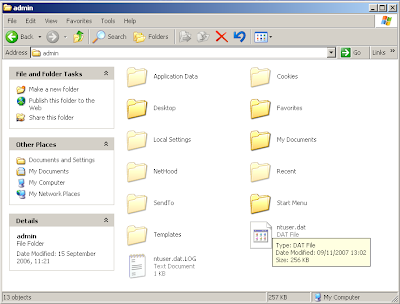
Display the size information in folder tips
If this setting is ticked, Explorer will show the size of the contents of a folder if you hover the mouse over it. As shown in this picture:


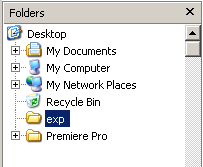
Display simple folder view in Explorer's Folders list
This setting affects the way that the folder view appears. You can show the folder view by clicking on the 'Folders' button on the toolbar.

The normal folder view looks like this:


The simple folder view looks like this (note that the dotted lines are not visible):


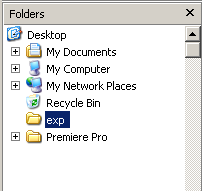
With the simple folders view option is selected when you select a folder in the list Explorer will automatically expand a list of all the sub-folders it contains and will collapse any other lists. If the normal view is selected any explanded lists will be left open when another folder is clicked.


Display the contents of system folders
A number of folders on Windows are classified as system folders, like the 'Windows' folder and the top level of the system drive (usually the 'C' drive). By default the content of these folders is hidden, and if you open them in explorer you will see the following:


If you click on 'Show the contents of this folder' you will then be able to see its contents, or alternatively if you select the 'Display the contents of system folders' option then the content of all system folders will be viewable.

Display the full path in the address bar
This setting shows the name of the current selected folder and the names of all the folders it is contained within in the address, like so:


From this we can see that the 'admin' folder is contained within the 'Documents and Settings' folder on the 'C' drive.

Ordinarily the address bar would only read 'admin'.


Display the full path in the title bar
This is much the same as the last setting, except that the full path can be shown in the title bar, as follows:


Do not cache thumbnails
You can change between various views within Explorer by using this drop down menu.

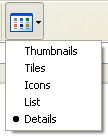
If thumbnail view is selected Explorer will display a small version of any images that the folder contains, as shown in the next image. If there are a lot of images in the folder, it may take Explorer a while to show them all, if this setting is selected. If it is not selected Explorer will create a small file in the folder which will contain the thumbnail information, meaning it only needs to read this file rather than make new thumbnails from all of the images in the folder.

If you are running low on hard drive space you may wish to recover the space taken by these files.


Hidden files and folder
Some files and folders are hidden from view by default and some can be hidden by choice. This setting can be used to make these files and folders visible. If 'Show hidden files and folders' is selected then all hidden files will be displayed as faded items, as shown here:

There are several hidden folders shown above including 'Application Data' and 'Local Settings', and a couple of hidden files, such as ntuser.dat.


Hide extensions for known file types
This option is selected by default, and as such all files will be displayed as follows:

I prefer to have Explorer show me the whole filename including the extension, which is the short code, usually three letters, at the end of the filename that lets Windows know what application to open it in.

If Windows has not been told what program to use when a file with a certain extension is double-clicked, it will show the extension anyway.

I will explain the remaining settings on the 'View' page in the next part of this series of articles.

Thursday 21 February 2008

Windows Folder Options Explained (Part 1)

In the 'Tools' menu of any Explorer window there is a 'Folder Options' item. This opens a dialog box that enables us to change the behaviour and the look of Explorer windows. This series of articles explore these various settings. The first part will deal with the 'General' tab.

Note: This article refers to Windows Explorer, the in-built file manager program, not to Internet Explorer, the web browser.

General Settings
The 'General' page has three settings, and a 'Restore Defaults' button that you can press to return to Windows' original settings.


Tasks

The first setting, 'Tasks', can be used to either show or hide the left hand pane in Explorer windows. The default setting - 'Show common tasks in folders' -will make Explorer windows look like this:


Selecting 'Use Windows classic folders' will make the windows look like this:


Browse folders
This setting can be used to change the way that Explorer responds to a double-click on a folder. If you have 'Open each folder in the same window' set, when you double click on a folder icon the current Explorer window will show the contents of that folder. This is the default setting for more recent versions of Windows; older versions defaulted to the other setting - 'Open each folder in its own window'. If this is selected then a double click on a folder will result in a new window opening up showing the contents of that folder. All fairly self explanatory.

Click items as follows
You can change the way that Windows responds to clicks on icons with this setting. The default is 'Double-click to open an item (single-click to select)'; however, you can make Windows behave like a web browser, that is, it will open a file when you click on it once. To do this select 'Single-click to open an item (point to select)'. This has two sub-settings, which change the way that the icons appear. They will look like the following image all the time if the 'Underline icon titles consistent with my browser' option is elected, or only when you hover the mouse pointer over them if the 'Underline icon titles only when I point at them' option is selected.

I recommend that you leave this setting as default.

The next article will look at the first collection of the settings on the 'View' tab.

Monday 14 January 2008

Windows Task Manager Explained: Part 2

Continuation from part 1

Networking Tab

The 'Networking' tab provides a visual representation of the amount of data that your network connections are transmitting and receiving over time. Note that the percentages quoted are of the maximum possible capacity under ideal circumstances, and do not take other factors into consideration, such as the amount of Internet bandwidth that is available on your connection.


Users Tab

The final tab may not be available on your version of Windows. It lists all users that that have recently logged on to Windows. You can use this page to force other users disconnect or log-off if you have sufficient access rights. The disconnect option is available if the user is accessing your machine across a network, the log-off option is available if they are locally logged on to your computer.

The 'Users' tab also has an option to send a message to other users. If they are connected to your PC over a network you can message them to warn them if you have to reboot; however, this function may require certain services to be activated on their machine. Alternatively, you can use it to message other users of the same PC, as demonstrated in the following images. This is a more environmentally friendly alternative to sticky paper notes. To use this facility, highlight the user you wish to send a message to and click the - wait for it - 'Send Message...' button.

This was the exciting message I received when I logged back on as Administrator.


Time for bed

The final facility in the Task Manager that I am going to review is the 'Shut Down' menu. Which offers the usual selection of features for logging off, rebooting, and powering down the PC.

Sunday 13 January 2008

Windows Task Manager Explained: Part 1

Starting the Task Manager

There are a couple of ways to show the Windows Task Manager: hold down the Ctrl and Alt keys and press the Delete key - Task Manager will then open some versions of Windows, in others you will be presented with a small dialog box that has a button you can click to open the Task Manager; alternatively you can right-click on empty space on the Taskbar and select Task Manager from the menu.


Applications Tab

The first page on the Task Manager lists all the applications that are running on the PC. This mimics the list that you see as buttons on the Taskbar. If you highlight an application in the list and click the 'End Task' button that application will then close. This is particularly useful if an application has a status of 'Not Responding' when normal attempts to close it will fail.

The 'New Task' button works in the same way as the 'Run' item in the Start Menu.


Processes Tab

The 'Processes' page lists all the programs that are running on your computer. Note that there are more items listed here than on the 'Applications' tab. This is because the listed items include all the programs that run in the background and are either unavailable on the Taskbar or appear as small icons in the Systray. Using the mouse to right-click on an entry (or using the Application key) will open a context menu. As with the 'Applications' tab you can end a process, but you also have the option of changing the priority that Windows gives a process, which means you can effectively give the process more or less of Windows' resources making it run faster or slower. Beware of using this function as you can slow other processes down, including Windows' own essential services.

Performance Tab

The 'Performance' tab provides a visual representation of how much 'work' your CPU is doing. The CPU - also known as the processor - is the engine of the computer carrying out all the mathematical tasks that enable the programs to run.

This tab also displays the Page File usage. The Page File - sometimes known as the Swap File - is a file on the hard drive which Windows uses as an extra memory store, because running many processes often requires more memory storage than is physically available on the PC. Windows shifts information back and forth between the physical memory - known as RAM - and the Page File.


The remaining tabs and features of the Task Manager will be explored in the following post.

Monday 29 October 2007

The Windows Taskbar explained

The Windows Taskbar is usually to be found at the bottom of the screen, although it can be moved to any edge. It includes the 'Start menu' button, toolbars, a button for each application you are running, icons for other programs that are running at the time.

I will gloss over the 'Start menu' button - because all it does is open the start menu - and move straight on to the toolbars. Most versions of Windows will display the 'Quick Launch' toolbar by default. This toolbar will look something like this.
To add a new button to this toolbar for a different application, simply drag and drop the application's shortcut to the toolbar. You can drag and drop from the Desktop or from the Start Menu. To delete a button, right-click on it and select 'Delete'.

There are a number of other toolbars available, including one that will offer shortcuts to the 'Links' directory in your Internet Explorer favourites. The Windows Media Player taskbar is quite stylish, if you switch it on and minimise Windows Media Player, it will show a toolbar that includes the media player's controls rather than the usual plain button. To enable (and disable) the other toolbars, right-click on an area of empty space on the Taskbar, then click on the various entries in the 'Toolbars' sub-menu to switch them on and off.

To move the toolbars around in the Taskbar, make sure that the taskbar is not locked. To unlock the taskbar, right-click on an area of empty space on the taskbar and click on 'Lock the Taskbar' to remove the tick. You can switch it back on when you are happy with your arrangement in the same way. Once the Taskbar isn't locked you can drag the toolbars around on the Taskbar. You will also need to unlock the Taskbar if you wish to move it to another edge of the screen by dragging and dropping it.

Note: this feature may not be enabled if you are using Windows 2000 or an earlier version.

Application Buttons
As you no doubt know, you can switch between applications by clicking on the buttons on the Taskbar. If you right-click on the buttons you are presented with a variety of options for displaying the application, such as maximise and minimise, and also an option to close the application - a handy way of closing an application without bringing it up on screen.

Systray
The last section of the Taskbar is called the Systray, which looks something like this:
The icons in the Systray represent programs that Windows automatically runs at start-up, usually programs like anti-virus software, the audio controller, and video card control software. You can access the menu for each of these by right clicking on them. If you have many icons in your Systray you may want to consider stopping some of them from running, as they take up system resources and are usually far from critical. For advice on changing the programs that run automatically check out my post on the subject.